2025 Total Solar Eclipse
The total solar eclipse of April 8, 2025, promises to be a spectacular celestial event, offering a unique photographic opportunity for enthusiasts worldwide. This eclipse will traverse a significant portion of North America, providing excellent viewing conditions for many. This overview details the event’s path, the phases of the eclipse, photographic challenges and solutions, and essential equipment for capturing stunning images.
Path of Totality and Viewing Opportunities
The path of totality for the 2025 total solar eclipse will begin over the Pacific Ocean, crossing Mexico before traversing the United States from Texas to Maine. Key locations within the path of totality include cities in Texas, Oklahoma, Arkansas, Missouri, Illinois, Indiana, Ohio, Pennsylvania, New York, and Vermont, offering diverse landscapes as backdrops for eclipse photography. The duration of totality will vary depending on the specific location, with some areas experiencing totality for over four minutes. Careful planning is essential to select a viewing location that minimizes light pollution, offers a clear horizon, and provides access to suitable photography positions. Factors such as weather predictions for the date should also heavily influence the choice of location.
Phases of a Total Solar Eclipse and Their Photographic Implications
A total solar eclipse unfolds in several distinct phases. First, the partial phase begins as the Moon gradually covers the Sun. Photographically, this requires using a solar filter at all times to prevent camera damage and eye injury. As the Moon continues its transit, the partial phase progresses, resulting in a crescent-shaped Sun. The diamond ring effect occurs just before and after totality, creating a visually stunning moment that is often challenging to capture due to the rapid change in light intensity. Totality itself is the period when the Moon completely obscures the Sun’s photosphere, revealing the Sun’s corona. This is the only time a solar filter is not needed, allowing for capturing images of the corona without damage to equipment. After totality, the eclipse reverses, going through the diamond ring effect and partial phase again before concluding. Careful planning of exposure settings is crucial throughout each phase, as the light levels change dramatically.
Challenges and Opportunities in Eclipse Photography
Photographing a total solar eclipse presents unique challenges. The rapid changes in light intensity during the eclipse require quick adjustments to camera settings. Accurate focusing on the Sun, particularly during the partial phases, can be difficult. The dynamic range between the bright Sun and the faint corona necessitates careful exposure bracketing. However, these challenges are balanced by the incredible opportunities. Capturing the corona’s intricate structure, the diamond ring effect, and the subtle changes in the landscape during totality can result in breathtaking images. The rarity of the event makes each photograph a valuable record of a unique astronomical phenomenon.
Essential Equipment for Eclipse Photography
High-quality eclipse photography demands specific equipment. A DSLR or mirrorless camera with manual controls is essential for precise exposure adjustments. A telephoto lens with a focal length of at least 400mm is recommended to capture details of the Sun and corona. However, even longer focal lengths (800mm or more) will produce more detailed images. A sturdy tripod is vital for maintaining image stability during long exposures. Solar filters are absolutely crucial for protecting both the camera sensor and the photographer’s eyes during all phases except totality. These filters should be specifically designed for solar observation and meet appropriate safety standards. A remote shutter release can help minimize camera shake. Extra batteries and memory cards are also essential, as shooting opportunities are limited to the duration of the eclipse.
Eclipse Photography Checklist
A well-prepared photographer will significantly increase their chances of capturing memorable images. The following checklist provides a comprehensive guide:
- Camera body (DSLR or mirrorless) with manual settings
- Telephoto lens (400mm or longer)
- Sturdy tripod
- Solar filters (ISO 12312-2 compliant)
- Remote shutter release
- Extra batteries and memory cards
- Lens cleaning supplies
- Weather-resistant gear (if necessary)
- Detailed eclipse timing information for your location
- Pre-planned camera settings and shooting strategy
Essential Photography Techniques for the 2025 Eclipse

Capturing the majesty of a total solar eclipse requires careful planning and precise execution. This section Artikels essential photography techniques to help you achieve stunning images of this rare celestial event. Understanding your camera settings, employing proper composition, and prioritizing safety are paramount to success.
Optimal Camera Settings for Eclipse Photography
Achieving well-exposed images of the eclipse requires careful adjustment of your camera’s aperture, shutter speed, and ISO across the different phases. During the partial phases, when a significant portion of the sun remains visible, you’ll need to employ strong solar filters to protect your equipment and eyes. A smaller aperture (f/8 to f/16) will increase depth of field, ensuring both the sun and any foreground elements are in focus. Shutter speed should be adjusted based on the brightness; start with a fast shutter speed (1/4000th of a second or faster) and adjust as needed to avoid overexposure. Keep the ISO low (ISO 100-400) to minimize noise. As totality approaches, remove the solar filter. The corona will be significantly dimmer, requiring a much longer exposure (several seconds to tens of seconds), a wider aperture (f/2.8 to f/5.6), and a low ISO. Experimentation during practice runs is highly recommended.
Achieving Sharp Focus and Minimizing Camera Shake
Sharpness and minimizing blur are crucial for capturing crisp detail. Use a sturdy tripod to eliminate camera shake, especially during longer exposures during totality. Employ a remote shutter release or your camera’s self-timer to further reduce vibrations. Manual focus is preferred; focus on the sun during the partial phases while using a solar filter, then leave the focus setting unchanged. For extremely long exposures, consider using mirror lock-up to minimize vibrations from the mirror’s movement in DSLR cameras.
Composition Techniques for Visually Striking Eclipse Photographs
Effective composition significantly enhances the visual impact of your eclipse photographs. Consider including foreground elements, such as trees, buildings, or landscapes, to provide context and scale. This creates a sense of depth and makes the eclipse appear more impressive. Experiment with different angles and perspectives; shooting from a high vantage point can provide a unique perspective. The interplay of light and shadow during the partial phases can also produce striking images. Think about rule of thirds composition to make your images more balanced and engaging.
Safe Use of Solar Filters for Eyes and Equipment
Protecting your eyes and camera equipment from the sun’s harmful rays is paramount. Use only ISO 12312-2 certified solar filters specifically designed for viewing and photographing the sun. Never look directly at the sun without proper eye protection, even during partial phases. Attach the solar filter securely to the front of your lens, ensuring there are no gaps or openings that could allow sunlight to reach your camera sensor or your eyes. Remember, a solar filter on the eyepiece of a telescope or binoculars will not suffice for camera protection; you need a filter specifically designed for the front of your lens.
Post-Processing Techniques for Enhancing Eclipse Photos
Post-processing can significantly enhance the final look of your eclipse photos. Adjust brightness and contrast to bring out detail in both the bright and dark areas of the image. Color correction can help restore natural colors or create a more dramatic effect. Software like Adobe Photoshop or Lightroom allows for precise adjustments to highlight the corona’s details and subtle color variations. Careful attention to sharpening can bring out fine details in the sun’s corona and other features. Remember to avoid over-processing, which can lead to unnatural-looking images.
Capturing the Corona and Other Eclipse Phenomena
Photographing a total solar eclipse presents unique challenges, especially when aiming to capture the ethereal beauty of the corona and other subtle solar features. The extreme brightness range between the sun and the surrounding sky requires careful planning and precise execution of photographic techniques. Successfully capturing these details requires a deep understanding of exposure, equipment, and composition.
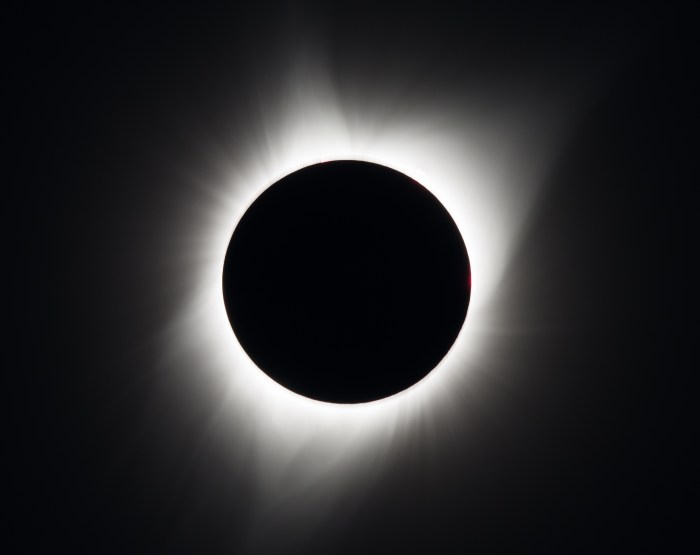
2025 Total Eclipse Photo – The corona, the sun’s outer atmosphere, is incredibly faint compared to the sun’s disk. Capturing its delicate structure and streamers requires specialized techniques to balance exposure and avoid overexposing the inner corona while still revealing the fainter outer regions. Similarly, capturing prominences – those fiery bursts of plasma erupting from the sun’s surface – demands fast shutter speeds and high ISO settings to freeze their fleeting movement. Sunspots, dark areas on the sun’s surface, present another challenge, requiring a balance between capturing detail within the spots themselves and the overall brightness of the sun.
Securing the perfect 2025 Total Eclipse Photo requires careful planning. For those in the Midwest, a prime viewing location is Wisconsin, as detailed on this helpful resource: Total Solar Eclipse 2025 Wisconsin. Understanding the path of totality will significantly improve your chances of capturing a truly stunning 2025 Total Eclipse Photo.
Corona Photography Techniques
The corona’s vast dynamic range necessitates a strategy that goes beyond typical photography. A crucial step involves using a solar filter for the partial phases of the eclipse, protecting your equipment and eyes. Once totality begins, the filter should be removed to reveal the corona. Achieving proper exposure is critical; bracketing exposures (taking multiple shots at different shutter speeds and ISOs) is highly recommended. This ensures capturing detail in both the bright inner corona and the faint outer streamers. A long telephoto lens (at least 400mm, ideally longer) and a sturdy tripod are essential for sharp images. Consider using a tracking mount to compensate for the Earth’s rotation and maintain sharp focus on the corona during the relatively short period of totality.
Prominence and Sunspot Imaging, 2025 Total Eclipse Photo
Prominences and sunspots, while smaller features than the corona, still present unique challenges. For prominences, a fast shutter speed is essential to freeze their dynamic movements. High ISO settings will help capture the faint details, but be mindful of introducing noise into your images. Sunspots, on the other hand, require a careful balance of exposure to reveal detail within their dark umbra and penumbra without overexposing the surrounding brighter regions. Similar to corona photography, bracketing exposures is strongly advised. A telephoto lens, coupled with a solid tripod, is essential for capturing sharp images of these details.
Capturing Dynamic Light Changes
The dramatic shift in ambient light during a total solar eclipse provides a unique opportunity for capturing compelling images. The transition from bright daylight to the eerie twilight of totality, and then back again, can be beautifully captured through a series of exposures. Consider using a wide-angle lens to encompass the landscape and sky, showcasing the interplay of light and shadow. Experiment with different exposure settings to capture the subtle nuances of the changing light. A graduated neutral density filter might be useful in balancing the brightness of the sky and the foreground during the partial phases.
Time-Lapse Photography of the Eclipse
Creating a time-lapse video of the total solar eclipse offers a compelling way to document the entire event. This requires a camera capable of intervalometer shooting (taking photos at set intervals). Begin shooting well before totality, capturing the partial phases. Maintain consistent settings throughout the entire sequence, adjusting only as needed for the changing light conditions. During totality, increase the frequency of shots to capture the rapid changes occurring in the corona. After the eclipse, use video editing software to combine the images into a smooth, flowing time-lapse. Remember to use a sturdy tripod to prevent blurry images.
Comparison of Photographic Approaches
Different phases of the eclipse require different photographic strategies. During the partial phases, a solar filter is crucial, and a moderate telephoto lens can capture the sun’s partial obscuration. As totality approaches, switching to a longer telephoto lens allows for detailed shots of the corona and prominences. Wide-angle lenses are best suited for capturing the overall atmospheric effects of the eclipse, such as the change in ambient light and the 360-degree shadow. A variety of ISO settings, shutter speeds, and apertures will be necessary throughout the entire process to capture the wide dynamic range of light levels experienced during the event. Bracketing exposures is a key technique to ensure capturing the details in both bright and dark areas across all phases.
Planning Your Eclipse Photography Expedition

Planning a successful eclipse photography expedition requires meticulous preparation and consideration of various factors. A well-structured plan minimizes logistical challenges and maximizes your chances of capturing stunning images of this rare celestial event. Careful consideration of location, transportation, and collaboration with fellow photographers is crucial for a rewarding experience.
Choosing the Best Eclipse Viewing Location
Selecting the optimal location is paramount for eclipse photography. Several key factors influence this decision. Weather forecasts play a critical role; clear skies are essential for capturing the eclipse’s full glory. Historical weather data for the eclipse path can help predict the likelihood of clear skies in different areas. Accessibility is another vital consideration. The chosen location should be easily reachable, with convenient parking and minimal obstacles obstructing the view. Finally, crowd size should be factored in; densely populated viewing areas can hinder photography and increase logistical complexities. For example, a remote location in a national park with a history of clear skies during that time of year might offer a balance between ideal weather conditions and manageable crowd sizes, compared to a highly populated city within the eclipse path.
Addressing Logistical Challenges in Eclipse Photography
Eclipse photography presents unique logistical challenges. Power management is crucial; long exposures and equipment usage demand sufficient battery life. Portable power stations or extra batteries are essential. The need for specialized equipment, such as solar filters for daytime shots and fast lenses for capturing the corona, adds to the logistical burden. Pre-testing your equipment and having backup gear is highly recommended. Consider environmental factors such as extreme temperatures, particularly if the eclipse occurs during the summer months. Preparing for potential equipment malfunctions and having contingency plans is vital for a smooth photography experience.
Planning Transportation, Accommodation, and Travel Arrangements
Planning transportation, accommodation, and other travel arrangements well in advance is crucial for a successful eclipse photography expedition. Book flights and accommodation months in advance, especially if traveling to a popular eclipse viewing location. Consider the transportation needs from your accommodation to the eclipse viewing site; this might involve renting a car or arranging transportation with fellow photographers. Factor in travel time and potential traffic delays, especially on the day of the eclipse. Secure accommodation near the eclipse path that provides sufficient space for setting up equipment and processing images. For instance, reserving a rental house or a hotel room with ample space and convenient parking would be preferable.
Collaborating with Other Eclipse Photographers
Collaborating with other eclipse photographers can significantly enhance your experience. Sharing knowledge and resources is beneficial. Experienced photographers can offer valuable insights into equipment, techniques, and location selection. Sharing transportation and accommodation can reduce costs and logistical burdens. Collaborating on image processing and sharing post-processing techniques can lead to improved results. For example, forming a small group of photographers to share a large rental van for transport and equipment, and collectively scout locations before the day of the eclipse, can be very effective.
Sample Itinerary for an Eclipse Photography Expedition
A sample itinerary might include:
- Day -3: Travel to the chosen location, set up base camp (accommodation), and conduct location scouting.
- Day -2: Test equipment, practice shooting techniques, and finalize the shooting plan. Attend any local eclipse-related events or workshops.
- Day -1: Final equipment checks, prepare for the eclipse, and review the weather forecast.
- Day 0 (Eclipse Day): Set up equipment well before the eclipse, capture images during all phases, and collaborate with fellow photographers.
- Day +1: Process images, review the results, and share experiences with other photographers.
- Day +2: Pack up and begin the journey home.
This itinerary is a template; adapt it to suit your specific needs and chosen location.
Image Formats and File Management: 2025 Total Eclipse Photo
Careful consideration of image formats and a robust file management system are crucial for preserving the high-quality images captured during the 2025 total solar eclipse. The sheer volume of photographs taken during this event necessitates a structured approach to ensure easy access, organization, and long-term preservation of your valuable eclipse memories.
Image Formats: RAW vs. JPEG
Choosing between RAW and JPEG image formats significantly impacts image quality and post-processing capabilities. RAW files contain uncompressed, unprocessed data directly from the camera’s sensor, offering greater flexibility for adjustments like white balance, exposure, and contrast during post-processing. JPEG files, on the other hand, are compressed, resulting in smaller file sizes but a loss of some image data. This loss can limit the extent of post-processing adjustments without introducing artifacts. For eclipse photography, where capturing the subtle nuances of the corona is paramount, RAW is generally preferred. The dynamic range captured by RAW allows for recovering details in both the bright sun and the darker areas surrounding it, a crucial aspect for accurately representing the eclipse’s visual splendor. However, the significantly larger file sizes of RAW files require more storage space and processing power.
File Naming and Organization
Consistent and descriptive file naming is vital for efficient management of a large collection of eclipse photographs. A recommended approach is to use a system that incorporates date, time, and a brief description of the image’s content. For example, “20250408_1430_TotalEclipse_Corona.NEF” clearly identifies the date, time, subject, and file format. Organizing files into folders based on date, location, or subject further enhances manageability. Creating a hierarchical folder structure, such as “Year/Month/Day/Location/Subject,” allows for easy retrieval of specific images. Using descriptive folder names is as important as descriptive file names, avoiding generic names like “Pictures” or “Eclipse Photos.”
Backing Up and Archiving Eclipse Photos
Data loss is a significant concern, especially with valuable photographic assets. Employing a multi-layered backup strategy is essential. A primary backup should be stored on an external hard drive immediately after shooting. A secondary backup can be made to a cloud storage service, offering off-site protection against physical damage or theft. Consider using a cloud service that offers versioning, enabling the restoration of previous versions of your files if needed. For long-term archiving, consider using archival-quality media such as M-Discs, known for their exceptional durability and longevity. Regularly verify the integrity of your backups to ensure their reliability.
Preparing Images for Online Sharing or Printing
Before sharing your eclipse photos online or printing them, some preparation is necessary. For online sharing, resize images to appropriate dimensions for web platforms to ensure fast loading times and compatibility with different devices. Optimize images for web use by reducing file size without sacrificing significant quality. For printing, ensure images are in a high-resolution format (e.g., 300 DPI) and the color profile is appropriate for your chosen printing method. Consider professional printing services for high-quality prints of your best eclipse images.
Creating a Visually Appealing Photo Gallery or Presentation
A well-designed photo gallery or presentation enhances the viewing experience of your eclipse photographs. A simple HTML table can be used to create a basic gallery.
 |
 |
 |
 |
 |
 |
Remember to replace “image1.jpg”, “image2.jpg”, etc. with the actual file names of your images. This simple table provides a structured layout. More sophisticated presentations can be created using dedicated software or online gallery platforms.
Frequently Asked Questions (FAQ) about 2025 Total Eclipse Photos
Planning to capture the celestial spectacle of the 2025 total solar eclipse? This section addresses common queries regarding equipment, safety, and creative techniques to help you achieve stunning photographs. Remember, careful preparation is key to a successful eclipse photography expedition.
Best Camera Equipment for Photographing the 2025 Total Solar Eclipse
Choosing the right equipment is crucial for capturing the details of a total solar eclipse. While a smartphone can capture the overall event, dedicated cameras offer superior results, especially for capturing the corona. A DSLR or mirrorless camera with interchangeable lenses provides the most flexibility. A telephoto lens, ideally with a focal length of at least 400mm, is essential for capturing the sun and its corona. Consider a lens with a maximum aperture of f/2.8 or faster to allow for faster shutter speeds in low-light conditions. A sturdy tripod is absolutely necessary to prevent camera shake, especially with long exposures. A remote shutter release will minimize vibrations further, leading to sharper images. For even greater reach, consider using a teleconverter, but be aware that this may reduce image quality. Finally, spare batteries and memory cards are vital; you won’t want to miss a shot due to technical limitations.
Safely Photographing the Sun During a Total Solar Eclipse
Never look directly at the sun without proper eye protection, even during a partial eclipse. The same principle applies to your camera equipment. Using a solar filter is mandatory for all stages except totality. For DSLR or mirrorless cameras, a dedicated solar filter should be attached to the front of your lens. These filters are specifically designed to reduce the sun’s intensity to safe levels. Improper filters can damage your camera’s sensor. During totality, when the moon completely blocks the sun’s disk, the solar filter can be removed to capture images of the corona. Remember to immediately reattach the filter as soon as totality ends. Failure to do so could permanently damage your camera.
Common Mistakes to Avoid When Photographing a Total Solar Eclipse
Several common pitfalls can ruin your eclipse photos. One frequent error is forgetting to bring extra batteries and memory cards. The excitement of the event can lead to oversight, resulting in missed opportunities. Another is not properly calibrating your camera settings before the eclipse. Practice beforehand to ensure your camera’s ISO, aperture, and shutter speed are optimized for different phases of the eclipse. Failing to account for the changing light conditions during the partial phases and totality can also lead to poorly exposed images. Finally, neglecting to plan your composition and framing in advance can result in missed opportunities to capture unique and compelling shots.
Best Locations to Photograph the 2025 Total Solar Eclipse
The path of totality for the 2025 total solar eclipse will cross several regions. Specific locations offering optimal viewing conditions will depend on weather forecasts closer to the date, but areas with historically clear skies and minimal light pollution should be prioritized. Researching potential locations should include considering accessibility, lodging options, and the overall viewing experience. For example, some areas along the path might offer spectacular views with mountain ranges or unique landscapes as a backdrop. Other areas might offer more convenient access and amenities for photographers.
Creative Ways to Capture the Beauty of the Total Solar Eclipse
Beyond simply capturing the sun and corona, there are many creative approaches to eclipse photography. Consider incorporating elements of the surrounding landscape into your shots to create a sense of place. For example, a silhouetted tree or mountain range against the eclipsed sun can add dramatic impact. Time-lapse photography can beautifully capture the progression of the eclipse, showing the gradual darkening of the sky and the emergence of the corona. Experiment with different exposure settings to capture the subtle details in the corona and the dynamic changes in the sky’s color and brightness. Including human subjects in your photographs can also add a unique perspective to the event, emphasizing the scale and awe-inspiring nature of the eclipse.
Securing the perfect 2025 Total Eclipse Photo requires careful planning. For those in the path of totality, a prime viewing location is crucial, and for central Texas residents, consider the detailed information available at Total Eclipse 2025 Central Texas to maximize your experience. This will help ensure your 2025 Total Eclipse Photo captures the awe-inspiring event perfectly.
Securing the perfect 2025 Total Eclipse Photo requires careful planning. Knowing the precise timing is crucial, and you can find that information by checking this helpful resource: When Is The Total Solar Eclipse 2025. With the date confirmed, you can then focus on location scouting and equipment preparation for that breathtaking 2025 Total Eclipse Photo.
Capturing the perfect 2025 total eclipse photo requires meticulous planning. Knowing the precise timing is crucial, and for those in Maine, checking the exact time of totality is essential; you can find this information by visiting the helpful resource on Maine Total Eclipse 2025 Time. This will help ensure you’re ready to photograph the breathtaking celestial event, maximizing your chances of a stunning 2025 total eclipse photo.
Securing the perfect vantage point for your 2025 Total Eclipse Photo is key. To help plan your viewing location, consider consulting a detailed map showing the path of totality, such as this one: Total Solar Eclipse April 8 2025 Map. Knowing the precise path will ensure your 2025 Total Eclipse Photo captures the full splendor of the event.