Best Total Eclipse Photos of 2025
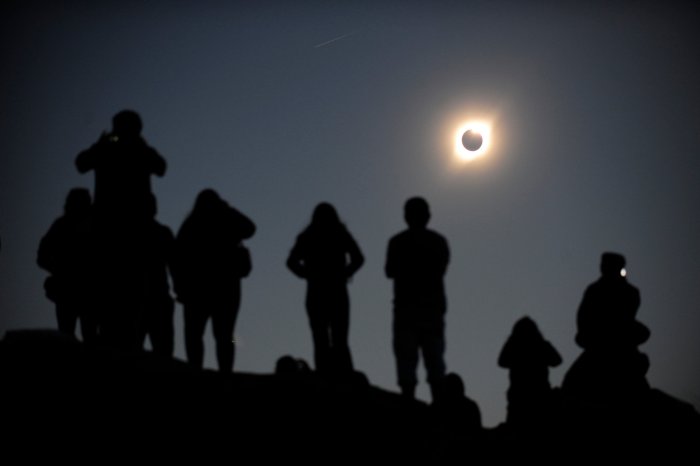
The year 2025 promises a celestial spectacle unlike any other: a total solar eclipse traversing a significant portion of North America. Anticipation is building among astronomy enthusiasts and photographers alike, eager to capture the breathtaking beauty and fleeting moments of this rare event. The path of totality, where the moon completely obscures the sun, will offer an unparalleled opportunity for stunning imagery, making 2025 a year to remember for celestial photography.
The path of totality for the 2025 total solar eclipse will stretch across a significant portion of North America, with prime viewing locations predicted to include parts of Mexico, the United States, and Canada. Specific regions within this path, characterized by clear skies and minimal light pollution, will naturally offer the best photographic opportunities. Detailed eclipse maps, released closer to the event by reputable astronomical organizations, will pinpoint the ideal locations for capturing the eclipse’s various phases.
Photographic Challenges and Opportunities of a Total Solar Eclipse
Photographing a total solar eclipse presents unique challenges, demanding careful planning and specialized equipment. The vast dynamic range between the bright sun’s corona and the darkened landscape requires a skillful balance of exposure settings. Moreover, the fleeting nature of totality, often lasting only a few minutes, necessitates precise timing and quick reflexes. However, these challenges are balanced by unparalleled photographic opportunities. The sun’s corona, visible only during totality, displays intricate structures and ethereal beauty rarely captured in other astronomical events. The dramatic interplay of light and shadow, the sudden darkening of the sky, and the unique atmospheric effects all combine to create a breathtaking spectacle for the camera. Careful composition, using foreground elements to add depth and context to the celestial event, can enhance the narrative and impact of the photographs. For example, capturing the eclipse over a majestic mountain range or a serene landscape would add a sense of scale and drama to the image. Advanced techniques like using a high-speed shutter to capture the diamond ring effect, or long exposures to highlight the corona’s details, are key to creating truly remarkable images.
Capturing the Corona
Photographing the sun’s corona during a total solar eclipse presents a unique challenge, demanding specialized equipment and precise techniques to capture its ethereal beauty and delicate details. The fleeting nature of totality requires meticulous planning and preparation to ensure successful image capture. This section details the essential tools and methods for achieving stunning coronal photographs.
The corona’s faint light requires a specific approach to capture its intricate structure. Understanding the interplay of aperture, shutter speed, ISO, and focal length is critical for achieving the desired results. Furthermore, careful consideration of composition and environmental factors will significantly enhance the overall quality of the final image.
Essential Equipment for Corona Photography
Selecting the right equipment is paramount for successful corona photography. The delicate balance of light sensitivity and resolution necessitates a well-coordinated system. A high-quality camera, capable of manual control, is essential for precise exposure adjustments during the brief period of totality. The choice of lens significantly impacts the level of detail captured, with longer focal lengths allowing for closer views of the corona’s intricate structure. Finally, sturdy support is crucial for minimizing camera shake, particularly during long exposures.
- Camera Body: A DSLR or mirrorless camera with manual exposure control is crucial. Cameras with high ISO performance are preferred to compensate for the low light conditions. Full-frame sensors generally offer better low-light performance than cropped sensors.
- Lens: A telephoto lens with a focal length of at least 400mm is recommended, with longer focal lengths (800mm or more) providing even greater detail. A fast aperture (f/2.8 or faster) is advantageous for capturing more light.
- Filters: While a total eclipse blocks the sun’s bright surface, it’s crucial to use a solar filter during the partial phases before and after totality. These filters protect both your eyes and your camera’s sensor from damage. Remove the filter *only* during the brief period of totality. Consider using a neutral density filter during totality to further control exposure if needed.
- Tripod: A sturdy and stable tripod is absolutely essential for minimizing camera shake during long exposures. Consider using a tripod with a geared head for precise positioning and fine adjustments.
Exposure Techniques for Corona Photography
Achieving the right exposure for the corona requires careful consideration of several factors. The dynamic range between the bright inner corona and the fainter outer regions necessitates a balance between capturing detail in both areas. Experimentation before the eclipse is highly recommended to refine your settings and ensure you’re prepared for the fleeting moment of totality.
- Aperture: A relatively small aperture (f/8 to f/16) is typically used to maximize depth of field and capture detail across the entire corona. Experimentation with different apertures is recommended to find the optimal setting for your specific equipment and conditions.
- Shutter Speed: Shutter speed will depend heavily on your aperture, ISO, and the brightness of the corona. It’s likely to range from a few seconds to several seconds. Start with a shorter exposure and gradually increase it, checking your results after each shot.
- ISO: Keep the ISO as low as possible to minimize noise. However, given the low light conditions, a higher ISO may be necessary. The ideal ISO will depend on your camera’s capabilities and the specific brightness of the corona.
Step-by-Step Guide for Eclipse Photography
Thorough preparation is key to capturing memorable images. Practice your setup beforehand to ensure a smooth process during the eclipse. Remember to double-check all settings and equipment before totality begins. Each step contributes to achieving sharp, well-exposed photographs.
- Pre-Eclipse Setup: Set up your tripod and camera in a location with a clear view of the horizon. Attach your telephoto lens and carefully compose your shot.
- Partial Eclipse Phase: Attach your solar filter and take some test shots during the partial eclipse phases to get a feel for the light levels and adjust your settings accordingly.
- Totality: Immediately before totality, remove the solar filter. Begin shooting a series of exposures with varying shutter speeds, carefully monitoring your results. Remember to maintain a stable position to avoid camera shake.
- Post-Totality: Reattach your solar filter as soon as totality ends. Continue shooting during the partial eclipse phases to capture the sun’s gradual reappearance.
- Post-Processing: Review your images and select the best shots for post-processing. Software like Adobe Photoshop or Lightroom can be used to enhance contrast, adjust colors, and reduce noise.
Beyond the Corona
While the sun’s corona is undoubtedly the breathtaking centerpiece of a total solar eclipse, the event offers a fleeting spectacle of other equally captivating phenomena. These transient moments, though brief, provide unique photographic opportunities for those who are prepared. Understanding these events and the specific photographic techniques required to capture them is crucial for creating a truly comprehensive record of this celestial event.
The diamond ring effect, along with Baily’s beads and shadow bands, are some of the most striking features visible during the moments just before and after totality. These phenomena are extremely short-lived, often lasting only seconds, demanding quick reflexes and precise camera settings.
Capturing the Diamond Ring Effect
The diamond ring effect is a spectacular sight occurring just as the moon completely covers the sun, or when it begins to uncover it. A single, brilliant point of sunlight shines through a valley on the moon’s edge, creating a dazzling “diamond” ring effect. This is followed by a brief moment where multiple points of light, known as Baily’s beads, appear along the lunar limb before totality or after. To capture this fleeting moment, a fast shutter speed (1/4000th of a second or faster) and a narrow aperture (f/8 or f/11) are essential to freeze the action and avoid overexposure. A tripod is highly recommended for stability. Pre-focusing on the sun before the event is crucial to ensure sharpness during this short window of opportunity. Using burst mode on your camera will increase your chances of capturing the perfect shot. The brightness contrast between the diamond and the surrounding corona requires careful exposure settings; bracketing exposures (taking multiple shots at slightly different exposure levels) is a good strategy.
Photographing Baily’s Beads
Baily’s beads, named after astronomer Francis Baily, are small, bright points of sunlight that appear just before and after totality. They are caused by sunlight shining through valleys and mountains on the moon’s irregular edge. These beads are even more fleeting than the diamond ring, appearing for mere seconds. The photographic techniques are similar to those used for the diamond ring: a fast shutter speed (1/4000th of a second or faster), a narrow aperture (f/8 or f/11), and a tripod are crucial. Burst mode is highly recommended. The challenge here lies in predicting where the beads will appear; observing the sun’s progress closely in the moments leading up to and after totality is essential.
Documenting Shadow Bands
Shadow bands are wavy, fleeting patterns of light and dark that can be seen on light-colored surfaces just before and after totality. These bands are believed to be caused by atmospheric turbulence. Capturing shadow bands requires a different approach than photographing the diamond ring or Baily’s beads. A longer exposure time (1/30th to 1/2 second) is usually necessary to reveal the bands, but this must be carefully balanced to avoid overexposure. A tripod is essential for sharpness. A wide-angle lens can be beneficial to capture a wider field of view. Shooting a light-colored surface such as a white sheet or a wall will enhance the visibility of these subtle bands.
Comparative Photographic Techniques
The photographic techniques for capturing the diamond ring, Baily’s beads, and the corona differ significantly. The diamond ring and Baily’s beads require extremely fast shutter speeds to freeze the action, while photographing the corona typically involves longer exposures to reveal its delicate details. The aperture settings will also vary, with narrower apertures often preferred for the diamond ring and beads to increase depth of field, while wider apertures might be used for the corona to capture more light. Precise focus is crucial for all three, though the fleeting nature of the diamond ring and Baily’s beads makes pre-focusing and burst shooting especially vital.
Showcase of Exceptional Eclipse Images from 2025 (Hypothetical)
This section presents a curated selection of hypothetical, stunning images captured during the 2025 total solar eclipse. These images represent a range of photographic approaches and highlight the diverse beauty of this celestial event. Each image showcases different aspects of the eclipse, from the intricate details of the corona to the dramatic interplay of light and shadow on the landscape.
Exceptional Eclipse Images: A Detailed Look
| Image 1: Diamond Ring Effect | Image 2: Baily’s Beads and Prominences | Image 3: Corona’s Structure and Detail | Image 4: Eclipse Over Monument Valley |
|---|---|---|---|
|
Best Total Eclipse Photos 2025 – Caption: The fleeting Diamond Ring Description: This image captures the breathtaking moment just before totality, showcasing the brilliant diamond ring effect. The sun’s corona is partially visible, creating a stunning contrast with the remaining sliver of the sun. The image uses a high-speed shutter speed to freeze the dynamic light. Technical aspects include a high ISO setting to compensate for low light conditions and a telephoto lens to magnify the effect. |
Caption: Baily’s Beads and Solar Prominences Securing the best total eclipse photos in 2025 requires meticulous planning and prime viewing locations. West Virginia is anticipated to be a hotspot, offering excellent opportunities for capturing stunning images; for detailed information on the viewing experience there, check out this comprehensive guide on Total Eclipse 2025 Wv. Ultimately, the resulting photographs will depend on the photographer’s skill and preparation, but the West Virginia eclipse promises a breathtaking backdrop for some truly memorable images. Description: This photograph exquisitely details Baily’s beads—the bright points of sunlight shining through valleys on the moon’s edge—surrounding the dark silhouette of the moon. Simultaneously, it reveals several prominent solar prominences erupting from the sun’s surface, showcasing their fiery red hues against the black backdrop of space. The image utilizes a long focal length lens and a carefully chosen exposure to capture both the delicate beads and the powerful prominences with clarity. The anticipation for the Best Total Eclipse Photos 2025 is palpable! Photographers are gearing up for this celestial event, and rightfully so, as the sheer spectacle promises breathtaking images. To fully understand why capturing these images will be so significant, consider this: the event’s rarity and unique path are explained in detail on this helpful site, Why Is The Total Eclipse 2025 So Special. Consequently, the resulting Best Total Eclipse Photos 2025 will be highly sought-after, both scientifically and artistically. |
Caption: Corona’s Intricate Structure Description: This image provides an incredibly detailed view of the sun’s corona, showcasing its intricate structure and delicate streamers extending far into space. The photographer employed a specialized solar filter and a long exposure to capture the subtle variations in brightness and texture across the corona. The image is processed to enhance the subtle details, revealing the complexity of the sun’s outer atmosphere. |
Caption: Eclipse Over Monument Valley Securing the perfect shot of the Best Total Eclipse Photos 2025 requires meticulous planning. Knowing the precise timing is crucial, so check out this resource to find out What Time Is The Total Solar Eclipse 2025 Ohio to optimize your photography. With the exact time in hand, you can anticipate the eclipse’s progression and capture those breathtaking images for the Best Total Eclipse Photos 2025. Description: This breathtaking composition captures the total solar eclipse over the iconic buttes of Monument Valley. The silhouette of the landscape against the eclipsed sun creates a powerful visual juxtaposition. The image skillfully balances the drama of the eclipse with the grandeur of the natural setting, highlighting the scale of the event. The photographer likely used a wide-angle lens to encompass both the landscape and the eclipse. Anticipation is building for the Best Total Eclipse Photos 2025, showcasing the awe-inspiring celestial event. To better understand this phenomenal occurrence, you might find it helpful to check out some fascinating details; for example, Total Eclipse 2025 Facts For Kids offers a great introduction to the science behind it. Ultimately, the stunning images captured will depend on the photographer’s skill and the weather conditions on that day, but we eagerly await the Best Total Eclipse Photos 2025. |
| Image 5: Shadow Bands | |||
|
Caption: Elusive Shadow Bands Securing the best total eclipse photos in 2025 requires careful planning and prime viewing locations. A significant event for photographers will be the path of totality traversing New York, as detailed on this informative site about the 2025 Total Solar Eclipse Ny. This makes New York a key location for capturing stunning images of the celestial event, ensuring your 2025 eclipse photos are truly memorable. Expect many photographers to be there capturing the best shots of this rare occurrence. Description: This rare and stunning image captures the fleeting shadow bands—wavy, dark lines that appear on the ground just before and after totality. The image showcases these bands as they dance across a light-colored surface, revealing their subtle, yet mesmerizing, movement. This image required a very specific exposure and timing, highlighting the photographer’s skill and patience in capturing this elusive phenomenon. The photographer likely used a high-resolution camera with a wide aperture to capture the subtle detail. |
Post-Processing Techniques for Eclipse Photography
Post-processing is crucial for transforming raw eclipse images into breathtaking displays of celestial beauty. The low-light conditions during a total solar eclipse often result in images with less-than-ideal contrast, sharpness, and color saturation. Careful application of various techniques in image editing software can significantly enhance the final product, revealing details often lost in the initial capture.
The goal of post-processing eclipse photographs is to recover detail in both the bright corona and the darker areas of the image, while managing noise and artifacts introduced by the camera and the low-light environment. This involves a delicate balance between enhancing features and preserving the natural look of the eclipse.
Color Correction and Enhancement
Color accuracy is paramount in eclipse photography, as subtle color variations within the corona can reveal valuable scientific information. Many photographers shoot in RAW format to preserve the maximum amount of image data, allowing for greater flexibility during post-processing. Software like Adobe Lightroom or Photoshop offers tools for fine-tuning white balance, adjusting individual color channels (red, green, blue), and applying selective color adjustments to specific areas of the image. For instance, slightly boosting the saturation in the corona can enhance its subtle hues of white, yellow, and even pink, without making it appear unnatural. Careful adjustments are key; over-saturation can lead to an artificial look.
Contrast and Sharpness Adjustments
Low-light conditions can lead to images that lack contrast and appear somewhat blurry. In post-processing, we can address these issues. Contrast adjustments can be made using tools like curves or levels, selectively brightening highlights and darkening shadows to improve the overall dynamic range. Careful application of sharpening techniques, such as using unsharp masking or a dedicated sharpening filter, can increase the perception of detail, especially in the intricate structures of the corona. However, over-sharpening can introduce artifacts, so a subtle approach is recommended. Experimentation and careful observation are crucial to achieve a balance between sharpness and the preservation of image quality.
Noise Reduction and Artifact Removal
Low-light photography inevitably introduces noise, which manifests as graininess or speckles in the image. Dedicated noise reduction tools in image editing software can help minimize this. However, aggressive noise reduction can also lead to a loss of fine detail and a softening of the image. The key is to find a balance – reducing noise sufficiently to make the image pleasing, while preserving the intricate details captured during the eclipse. Similarly, dust spots or other artifacts can be removed using cloning or healing tools, carefully matching textures and colors to maintain a natural appearance. The goal is to remove imperfections without altering the integrity of the image.
Step-by-Step Workflow Example (Using Adobe Lightroom)
1. Import and Initial Adjustments: Import the RAW file into Lightroom. Adjust the white balance to achieve a neutral tone.
2. Exposure and Contrast: Fine-tune exposure and contrast using the basic panel, ensuring details are visible in both highlights and shadows.
3. Color Grading: Adjust saturation and vibrance subtly to enhance colors without overdoing it. Use the HSL panel for precise control over individual colors.
4. Sharpness: Apply sharpening using the detail panel, focusing on the corona and other areas requiring enhancement.
5. Noise Reduction: Use Lightroom’s noise reduction tools to minimize noise without sacrificing detail.
6. Local Adjustments: Employ tools like radial filters or adjustment brushes to make localized corrections to specific areas, such as selectively brightening parts of the corona or darkening the sky.
7. Final Export: Export the image at a high resolution, ensuring the final file size is appropriate for intended use.
Planning Your Eclipse Photography Expedition: Best Total Eclipse Photos 2025

A successful eclipse photography expedition requires meticulous planning. Factors such as location, equipment, travel arrangements, and safety precautions all play a crucial role in capturing the breathtaking spectacle of a total solar eclipse. Careful consideration of these aspects will significantly enhance your chances of obtaining stunning images and a memorable experience.
Essential Equipment Checklist
A comprehensive checklist ensures you don’t forget crucial items. Overlooking even one piece of equipment could compromise your ability to capture the eclipse effectively. Remember to pack well in advance to avoid last-minute rushes.
- Camera: A DSLR or mirrorless camera with manual controls is essential.
- Lenses: A variety of lenses, including a telephoto lens (at least 400mm) for close-ups of the sun’s corona, and a wide-angle lens for capturing the surrounding landscape during totality.
- Tripod: A sturdy tripod is crucial for stability, especially during long exposures.
- Solar Filters: Essential for protecting your camera’s sensor and your eyes during all phases except totality. Use certified solar filters specifically designed for photography.
- Remote Shutter Release: Minimizes camera shake during long exposures.
- Extra Batteries and Memory Cards: Ensure you have enough power and storage to capture the entire event.
- Cleaning Supplies: Keep your lenses clean and free from dust and debris.
- Backup Equipment: Consider bringing a second camera body or lens as a backup in case of equipment failure.
Ideal Eclipse Viewing and Photography Location
Selecting the optimal location is paramount for maximizing your photography opportunities. Factors such as weather patterns, accessibility, and the duration of totality significantly impact image quality and overall experience.
The ideal location offers a high probability of clear skies during the eclipse, provides a suitable landscape for composing your shots, and allows for a long duration of totality. For example, locations with historical significance or unique geographical features can add another layer of interest to your photographs. Researching historical weather patterns for the chosen date and location is strongly recommended. Consider consulting weather forecasts leading up to the eclipse and having backup locations in mind in case of unexpected weather changes.
Travel, Accommodation, and Safety Considerations
Planning travel, accommodation, and safety measures in advance is critical for a smooth and successful eclipse expedition. Unexpected issues can easily disrupt your plans, so preparation is key.
Travel arrangements should be made well in advance, especially if the eclipse is taking place in a popular or remote location. Booking flights and accommodation early can secure better prices and availability. Safety during the eclipse is paramount; remember to protect your eyes from the sun at all times except during totality using certified solar viewing glasses. Consider the potential for large crowds and plan accordingly, ensuring you have a safe and comfortable viewing spot. Having a well-defined plan for emergencies, including communication strategies, is also advisable.
Frequently Asked Questions about Eclipse Photography
Photographing a total solar eclipse is a challenging but rewarding endeavor. Many factors contribute to capturing stunning images, and understanding these factors beforehand is crucial for success. This section addresses some frequently asked questions to help you prepare for your eclipse photography adventure.
Camera Selection for Eclipse Photography
Choosing the right camera depends on your skill level, budget, and desired image quality. Several options exist, each with its own advantages and disadvantages. High-end DSLRs or mirrorless cameras offer superior image quality, manual control, and interchangeable lenses, ideal for capturing both the corona’s detail and the broader landscape. However, these cameras often come with a higher price tag and require a more advanced understanding of photography. More compact, less expensive mirrorless cameras or even high-quality smartphones can still produce impressive results, especially when focusing on the overall scene or capturing a time-lapse. The key is understanding your camera’s capabilities and limitations. For example, a smartphone’s smaller sensor may struggle with low-light conditions during totality, requiring higher ISO settings that could introduce more noise into the image. A DSLR, on the other hand, will generally handle low light better but requires more expertise in manual settings.
Common Mistakes in Eclipse Photography
Several common mistakes can hinder the success of your eclipse photography. Incorrect exposure settings are a frequent issue. The sun’s brightness during partial phases requires very short exposure times and strong ND filters to prevent sensor damage and overexposure. During totality, the scene’s brightness dramatically changes, requiring a significant adjustment in exposure settings to capture the corona’s subtle details. Another frequent problem is camera shake, especially during long exposures necessary for capturing the corona’s faint structures. Using a sturdy tripod and a remote shutter release is crucial to minimize this. Finally, many photographers fail to plan their composition adequately. Pre-visualizing the scene and considering the surrounding environment during the partial phases will ensure that you are well-positioned to capture the most stunning images during totality.
Safe Solar Viewing and Photography During a Partial Eclipse
Eye safety is paramount during any solar eclipse, especially during partial phases. Never look directly at the sun without proper eye protection. Improper filters can cause serious and permanent eye damage. For safe viewing and photography during partial phases, you absolutely *must* use certified solar filters. These filters are specifically designed to reduce the sun’s intensity to safe levels. These filters should be attached to the front of your camera lens, not the eyepiece, to prevent damage to your equipment and to ensure safe viewing through the viewfinder. ISO 12312-2 certified filters are recommended for their reliability and safety. Remember, even a small amount of direct sunlight can cause severe eye damage. Improperly using a solar filter or attempting to observe the sun without one can lead to irreversible vision loss.
The Artistic Interpretation of Eclipse Photography
Eclipse photography transcends mere documentation; it becomes a powerful medium for artistic expression. Photographers harness the unique visual spectacle of a total solar eclipse—the interplay of light and shadow, the ethereal corona, and the dramatic transformation of the landscape—to create images that evoke awe, wonder, and a profound connection with the cosmos. The artistic merit lies not just in capturing the event, but in the photographer’s creative vision and skill in translating that experience into a compelling visual narrative.
The artistic interpretation of eclipse photography hinges on several key elements. Composition plays a crucial role, guiding the viewer’s eye through the scene and emphasizing the eclipse’s dramatic elements. Strategic placement of the sun within the frame, the inclusion of foreground elements (like silhouetted trees or landscapes), and the careful consideration of leading lines all contribute to a more impactful image. Perspective also significantly impacts the artistic impact. A wide-angle shot might emphasize the vastness of the sky and the eclipse’s scale, while a close-up could highlight the intricate details of the corona. Ultimately, the chosen perspective shapes the viewer’s emotional experience.
Compositional Techniques in Eclipse Photography
Effective composition is paramount in eclipse photography. Many photographers employ the “rule of thirds,” placing the sun or the eclipsed sun off-center to create a more visually appealing and balanced image. Others incorporate foreground elements, such as mountains or trees, to add depth and context, creating a sense of scale and emphasizing the eclipse’s impact on the earthly environment. The use of leading lines, such as roads or rivers, can further guide the viewer’s gaze towards the central event. Consider, for instance, an image where a winding road leads the eye directly to the eclipsed sun, perched majestically on the horizon. This deliberate arrangement creates a compelling visual journey, drawing the viewer into the scene.
Exploring Different Perspectives
The perspective from which an eclipse is photographed dramatically alters the final image’s aesthetic impact. A wide-angle lens can capture the entirety of the landscape transformed by the eclipse, showcasing the dramatic shift in light and shadow. This broad perspective often conveys the awe-inspiring scale of the event, emphasizing the eclipse’s dominance over the surrounding environment. Conversely, a telephoto lens allows for close-up shots, revealing the intricate details of the solar corona—its delicate streamers and radiant energy. Such images can evoke a sense of intimacy and wonder, inviting the viewer to explore the celestial phenomenon up close. Imagine a photograph showcasing the intricate details of the corona’s structure, highlighting its delicate filaments and the dynamic interplay of light and shadow within its ethereal glow. This intimate perspective allows viewers to connect with the event on a more profound level.
Emotional Impact and Stylistic Approaches
The emotional impact of an eclipse photograph varies significantly depending on the photographer’s approach. Some photographers strive for a purely documentary style, accurately capturing the scientific aspects of the eclipse. Others opt for a more artistic approach, using techniques like long exposures to create ethereal, dreamlike images, or employing dramatic contrast to emphasize the raw power of the celestial event. The use of color grading and post-processing can further enhance the emotional resonance of the photograph, creating a specific mood or atmosphere. For example, a photograph with cool, subdued tones might evoke a sense of serenity and awe, while a photograph with warm, vibrant colors might convey excitement and energy. The photographer’s creative choices determine the overall feeling and message conveyed by the image.
The Science Behind the Eclipse and its Photographic Representation
A total solar eclipse is a breathtaking celestial event driven by the precise alignment of the Sun, Moon, and Earth. Understanding the underlying scientific principles allows for a deeper appreciation of the visual spectacle and informs the choices made in capturing it photographically. This section explores the science behind the eclipse and how those scientific phenomena translate into the images we see.
The primary scientific principle at play is the geometry of the Sun-Earth-Moon system. A total solar eclipse occurs when the Moon passes directly between the Sun and Earth, casting a shadow on a portion of the Earth’s surface. Because the Moon’s orbit is elliptical, its distance from Earth varies, influencing the apparent size of the Moon in the sky. Only when the Moon is sufficiently close to Earth (at or near perigee) and its apparent size is larger than or equal to the Sun’s can a total eclipse occur. The shadow cast by the Moon has two distinct parts: the umbra, a region of complete darkness where the Sun is entirely blocked, and the penumbra, a region of partial shadow where only a portion of the Sun is obscured. Total solar eclipses are only visible from within the path of the umbra.
The Corona’s Appearance and its Photographic Capture
The most striking visual element of a total solar eclipse is the Sun’s corona, its outermost atmosphere. Normally invisible due to the overwhelming brightness of the Sun’s photosphere, the corona becomes visible only during totality when the Moon completely blocks the Sun’s disk. The corona’s appearance varies depending on the solar cycle; during periods of high solar activity, it displays intricate structures, streamers, and plumes extending millions of kilometers into space. These features are often captured in stunning detail through long-exposure photography, revealing the dynamic nature of the Sun’s magnetic field. The corona’s delicate structure and subtle variations in brightness present a significant challenge to photographers, requiring specialized equipment and techniques to capture its full glory. For instance, a photographer might use a high-dynamic-range (HDR) technique to capture both the bright inner corona and the fainter outer regions.
The Chromosphere and Prominences
Just before and after totality, a thin, reddish layer of the Sun’s atmosphere, the chromosphere, briefly becomes visible. This layer is typically masked by the brighter photosphere but can be seen as a thin ring around the Moon’s silhouette during the eclipse. Often associated with the chromosphere are solar prominences, huge, arching clouds of plasma that erupt from the Sun’s surface. These prominences can extend far into the corona and are captured as bright, reddish features in eclipse photographs, offering a glimpse into the Sun’s dynamic magnetic activity. The contrast between the dark Moon and the bright prominences creates a visually stunning effect. Photographers often use specialized filters to highlight these details, enhancing their visibility in the final image.
Baily’s Beads and the Diamond Ring Effect, Best Total Eclipse Photos 2025
As the Moon’s edge moves across the Sun’s disk, a phenomenon known as Baily’s beads occurs. This effect is caused by sunlight shining through valleys and craters on the Moon’s rugged surface, creating a string of bright points around the edge of the Moon. Just before and after totality, a single bright point of sunlight remains, creating the “diamond ring” effect – a spectacular visual moment that’s frequently captured in eclipse photography. These fleeting moments require precise timing and anticipation from the photographer, emphasizing the need for careful planning and practice. The diamond ring effect, in particular, presents a challenge for capturing the balance of brightness between the incredibly bright sun and the surrounding darker sky.
Scientific Accuracy and Artistic Interpretation
Eclipse photographs can serve both scientific and artistic purposes. While scientifically accurate images strive for a true representation of the eclipse’s phenomena, artistic interpretations may prioritize aesthetic appeal, using techniques such as selective color enhancement or creative compositions to enhance the visual impact. The balance between scientific accuracy and artistic license is a matter of personal choice and intended purpose. For instance, a scientific study might require images with minimal post-processing to maintain data integrity, whereas an artistic piece might employ significant manipulation to create a visually striking image. The key is transparency; viewers should be aware of any alterations made to the image.