Total Eclipse 2025 Timelapse
The total solar eclipse of April 8, 2025, presents a spectacular astronomical event and a unique opportunity for breathtaking timelapse photography. This eclipse will traverse a significant portion of North America, offering extended viewing periods for those within the path of totality. The precise path and duration will vary depending on the specific location, but the overall experience promises to be a memorable one for both amateur and professional photographers alike.
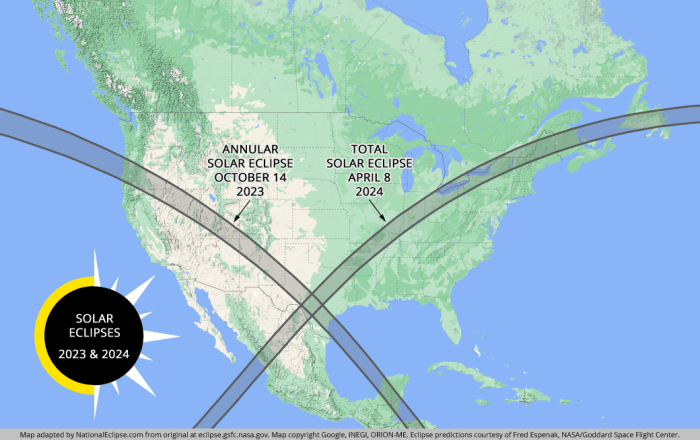
The path of totality for the 2025 eclipse will sweep across a broad swathe of the continent, starting in Mexico and moving north-eastward across the United States and Canada. This wide path ensures that many people will have access to witness the total eclipse, making it a widely accessible event for astronomical enthusiasts. The duration of totality – the period when the moon completely obscures the sun – will vary along the path, potentially lasting several minutes in some locations. This extended duration provides ample time for capturing stunning timelapse sequences.
Photographic Opportunities During the 2025 Total Solar Eclipse
Timelapse photography offers a unique perspective on the dynamic changes occurring during a total solar eclipse. The gradual darkening of the sky, the appearance of the sun’s corona, and the shifting patterns of light and shadow all lend themselves beautifully to timelapse capture. By using a camera with a suitable intervalometer and a sturdy tripod, photographers can capture the subtle yet significant changes occurring over time, creating a captivating visual record of the event. A series of still images taken at regular intervals can then be compiled into a smooth, cinematic timelapse video. The contrast between the dark moon’s silhouette and the brilliant corona, the changing ambient light, and the reactions of the surrounding environment provide rich photographic subjects for creating a compelling narrative in a timelapse. The unique visual effects, such as the diamond ring effect at the beginning and end of totality, are particularly well-suited to this technique, allowing for a dynamic and dramatic visual representation. Furthermore, the incorporation of the surrounding landscape into the timelapse adds context and visual interest.
Scientific Significance of Total Solar Eclipses
Total solar eclipses are not merely visually stunning events; they also hold significant scientific value. These events provide rare opportunities for researchers to study the sun’s corona, the outermost part of its atmosphere, which is usually obscured by the brighter light of the sun’s surface. Observations during totality allow scientists to analyze the corona’s temperature, density, and magnetic field, providing valuable insights into solar physics. Additionally, eclipses offer a chance to study the sun’s gravitational effects on light, as demonstrated by the bending of starlight around the sun’s mass – a phenomenon predicted by Einstein’s theory of general relativity. The documentation of these events through photography and videography, especially timelapse techniques, provides valuable data for scientific analysis and contributes to our understanding of the sun and its impact on our solar system. Historically, observations during total solar eclipses have led to significant breakthroughs in our understanding of solar physics and astrophysics. For example, the discovery of helium was made during a total solar eclipse in 1868, showcasing the importance of these events for scientific advancement.
Planning Your Total Eclipse 2025 Timelapse
Capturing a total solar eclipse timelapse requires meticulous planning and preparation. Success hinges on a well-defined strategy encompassing equipment selection, location scouting, and a precise shooting schedule to ensure you capture the breathtaking progression of the eclipse from beginning to end. This plan will guide you through the essential steps.
Careful preparation is key to successfully capturing a stunning timelapse of the 2025 total solar eclipse. Failing to plan adequately could result in missed opportunities or suboptimal image quality. This section details a comprehensive checklist to help you avoid such pitfalls.
Equipment Checklist for Total Eclipse Photography
A successful eclipse timelapse necessitates the right equipment. Consider these essential items and their potential alternatives:
- Camera: A DSLR or mirrorless camera capable of shooting high-resolution stills in RAW format is recommended for maximum image quality and post-processing flexibility. A camera with intervalometer functionality (or an external intervalometer) is crucial for timelapse photography.
- Lens: A telephoto lens (at least 300mm, ideally longer) is essential for capturing detailed images of the sun and corona during totality. Consider a lens with image stabilization to minimize blur. A wide-angle lens can also be used to capture the surrounding environment and the changing light conditions.
- Tripod: A sturdy, heavy-duty tripod is absolutely essential for maintaining stability during long exposures and timelapses. A tripod with a geared head provides precise and smooth camera movements.
- Solar Filter: This is critically important. Never look directly at the sun without proper eye protection, and similarly, never point your camera at the sun without a solar filter securely attached to the front of your lens. Use only certified solar filters specifically designed for astrophotography. Improper filters can damage your equipment and eyesight. Remove the filter only during the brief period of totality.
- Intervalometer: This device or camera feature allows for automated shooting at set intervals, crucial for creating a timelapse. Ensure compatibility with your camera model.
- Extra Batteries and Memory Cards: Bring plenty of extra batteries, as cold temperatures can drain them quickly. Use high-capacity memory cards to avoid running out of storage space.
- Remote Shutter Release (Optional): This minimizes camera shake during exposures, especially useful with longer lenses.
Location Scouting and Considerations
Choosing the right location is paramount. The path of totality for the 2025 eclipse will traverse specific areas; research these beforehand.
- Path of Totality: Ensure your chosen location falls directly within the path of totality, allowing for the full experience of the total eclipse. The duration of totality varies across the path.
- Weather Conditions: Check historical weather data for the chosen location to assess the likelihood of clear skies during the eclipse. Cloud cover can ruin your timelapse.
- Accessibility and Permits: Research accessibility to the location. Some areas may require permits or have restricted access.
- Horizon Obstructions: Select a location with an unobstructed view of the horizon, ensuring nothing will interfere with your view of the eclipse.
- Safety and Security: Choose a safe and secure location, considering factors such as potential crowds and emergency services availability.
Eclipse Shooting Schedule
A detailed schedule ensures you capture all phases of the eclipse.
- Partial Phases: Begin shooting well before the partial phases begin, capturing the subtle changes in sunlight as the moon starts to obscure the sun. Use your solar filter at all times during these phases.
- Totality: Remove your solar filter only during the brief period of totality, when the sun’s corona is visible. Adjust your camera settings to capture the details of the corona. This is the most crucial part of your timelapse.
- Post-Totality: Reattach your solar filter immediately after totality and continue shooting as the moon moves away from the sun.
- Interval Settings: Experiment with different interval settings before the eclipse. Consider a faster interval during the partial phases and a slower interval during totality to capture more detail.
Camera Settings and Image Quality
Optimal camera settings are crucial for a high-quality timelapse.
- Shooting Mode: Use manual mode (M) to have full control over your settings. This is especially important during totality, where the light levels change drastically.
- Aperture: Start with a relatively small aperture (e.g., f/8-f/11) to maintain sharpness across the frame during the partial phases. You might adjust to a slightly wider aperture (e.g., f/5.6) during totality to allow more light to reach the sensor.
- Shutter Speed: Use a fast enough shutter speed to avoid motion blur. You’ll need to adjust this throughout the eclipse, especially during totality. Use your camera’s built-in light meter as a guide.
- ISO: Keep the ISO as low as possible (e.g., ISO 100) to minimize noise. You may need to increase it slightly during the partial phases or totality if light levels are low, but avoid excessively high ISO values.
- White Balance: Set your white balance to a setting appropriate for daylight. You may need to adjust this during totality to account for the change in light color.
- File Format: Shoot in RAW format for maximum image quality and post-processing flexibility. RAW files contain more image data than JPEGs.
Essential Equipment for Timelapse Photography
Capturing a stunning timelapse of a total solar eclipse requires careful planning and the right equipment. A successful timelapse will depend on the quality of your gear and your understanding of how to use it effectively. This section details the essential equipment and techniques needed to achieve professional-looking results.
Camera Bodies and Lenses
The choice of camera body depends largely on your budget and desired image quality. A high-resolution camera with good low-light performance is crucial, as the sky will darken significantly during totality. Cameras capable of intervalometer control (for automated shooting) are essential for timelapse photography. Many modern DSLRs and mirrorless cameras offer this functionality built-in, or through external triggers. For lenses, a telephoto lens is necessary to capture the detail of the sun and the corona during totality. Focal lengths ranging from 400mm to 1200mm are commonly used, with longer focal lengths offering greater magnification. A sturdy tripod is crucial for keeping the camera stable during the long exposure sequence, and a lens with image stabilization can further mitigate any minor vibrations. Using a wide-angle lens can also be beneficial to capture the surrounding landscape and the changing ambient light conditions before and after totality.
Solar Filters and Safe Usage
Specialized solar filters are absolutely crucial for protecting your camera and your eyes during the partial phases of the eclipse. Looking directly at the sun, even partially eclipsed, can cause permanent eye damage. Never point your camera at the sun without a properly rated solar filter attached to the front of the lens. These filters should have an optical density of at least 5.0, meaning they block 99.999% of visible light. Avoid using homemade filters or neutral density filters intended for other purposes, as these may not provide adequate protection. Only remove the solar filter during the brief period of totality, when the sun’s corona is visible. It’s crucial to accurately predict the time of totality and to rehearse the filter removal and reattachment procedure beforehand.
Timelapse Shooting Techniques
Several timelapse shooting techniques can be employed, each with its advantages and disadvantages. A common approach involves taking a series of still images at regular intervals (e.g., every 5-10 seconds) throughout the eclipse. This method provides flexibility in post-processing, allowing for fine-tuning of the final timelapse. Another approach is to use a higher frame rate during the critical phases of the eclipse (such as totality), creating a smoother, more detailed timelapse of this crucial event. This might involve shooting at a rate of 1-2 frames per second during totality, while using a slower frame rate for the partial phases. The choice of technique will depend on factors such as the desired final length and the desired level of detail in the timelapse. Pre-planning the shooting schedule, including the specific times for different shooting rates, is crucial for maximizing the impact of the timelapse.
Capturing the Eclipse
Successfully capturing a total solar eclipse on timelapse requires careful planning and execution. The fleeting nature of totality demands a strategic approach to ensure you capture the full drama and subtle details of this celestial event. This section details techniques and best practices to help you achieve stunning results.
Composing shots that effectively capture the beauty and drama of a total solar eclipse hinges on understanding the event’s progression and your equipment’s capabilities. Pre-visualization is key. Consider the environment; a wide shot might showcase the landscape darkening around you, while a tighter composition could focus on the sun’s corona. Experimenting with different focal lengths allows you to capture the grandeur of the eclipse and the intricate details of the corona simultaneously.
Timelapse Techniques for Eclipse Photography
Timelapse photography is ideally suited to capturing the slow, majestic unfolding of a total solar eclipse. By taking many still images over a period of time and then compiling them into a video, you condense hours into a few short, breathtaking minutes. This allows viewers to witness the entire event, from the initial partial phases to the awe-inspiring totality and the subsequent return to normalcy. The interval between shots should be carefully considered. During the partial phases, a longer interval (e.g., 10-30 seconds) may suffice, but during totality, a much shorter interval (e.g., 1-2 seconds) is needed to capture the rapid changes in the corona’s structure and brightness. Software such as LRTimelapse or similar programs are invaluable in post-processing to create smooth and visually appealing timelapse sequences.
Focusing on the Corona and Subtle Details During Totality
The corona, the sun’s outer atmosphere, is only visible during totality. Its delicate structure, streamers, and prominences are ephemeral and require precise focus and exposure settings. Autofocus often struggles in low-light conditions, so manual focus is highly recommended. Using live view on your camera’s screen to fine-tune focus on the corona before totality is crucial. Precise exposure is also essential; slight overexposure can wash out the delicate details of the corona, while underexposure will result in a dark, indistinct image. Experimentation with different ISO settings and exposure times during practice runs is highly recommended to achieve the optimal balance. Consider using a neutral density filter even during totality to prevent overexposure of the corona, especially with longer exposures.
Post-Processing Your Timelapse Footage
Post-processing your eclipse timelapse footage is crucial for transforming raw footage into a captivating final product. This stage involves refining the visuals, correcting imperfections, and assembling the various clips into a cohesive narrative. Effective post-processing can dramatically enhance the impact of your timelapse, revealing the subtle beauty and dynamism of the celestial event.
The process generally involves several key steps, from initial organization and stabilization to color grading and final rendering. Choosing the right software is the first important step, followed by careful application of various editing techniques to achieve a polished and professional-looking result.
Software Selection
Several software options are available for post-processing timelapse footage, each offering a unique set of features and capabilities. Popular choices include Adobe Premiere Pro, After Effects, and DaVinci Resolve. Premiere Pro excels in video editing and timeline management, making it ideal for assembling the timelapse sequence. After Effects provides advanced compositing and visual effects tools, useful for adding subtle enhancements or correcting imperfections. DaVinci Resolve offers a comprehensive suite of tools, including color grading and audio editing capabilities, all within a single application. The best choice depends on your existing skills, budget, and the complexity of your project.
Noise Reduction Techniques
Timelapse photography often introduces noise, particularly in low-light conditions. This noise can manifest as graininess or unwanted artifacts in the final video. Several techniques can effectively mitigate noise. Software like Adobe Premiere Pro and DaVinci Resolve offer built-in noise reduction tools, allowing you to adjust parameters such as strength and detail preservation. Careful consideration should be given to balancing noise reduction with preserving image detail, as overly aggressive noise reduction can result in a loss of sharpness and texture. Experimentation with different settings and careful observation of the results are key to finding the optimal balance. For more advanced noise reduction, consider dedicated plugins such as Neat Video or Topaz Denoise AI, which often provide superior results compared to built-in tools.
Color Correction and Grading
Accurate color correction is essential for achieving a visually appealing timelapse. The goal is to ensure consistent color throughout the sequence and to enhance the overall aesthetic. This often involves adjusting white balance, exposure, and contrast. Color grading goes beyond correction, allowing you to creatively manipulate the colors to evoke a particular mood or style. Software such as DaVinci Resolve provides advanced color grading tools, enabling fine-grained control over color saturation, hue, and luminance. Consider using reference images or videos to guide your color grading decisions, ensuring consistency and visual harmony throughout your timelapse.
Workflow for Assembling the Final Timelapse
Assembling your final timelapse video involves a structured workflow to ensure a smooth and efficient process. Begin by organizing your footage chronologically, ensuring that all clips are properly named and easily accessible. Import your clips into your chosen video editing software. Then, stabilize your footage to compensate for any camera movement. Next, apply noise reduction and color correction as described above. Once your footage is refined, assemble the clips into a continuous sequence, adjusting the speed and duration as needed. Finally, add music and other visual elements such as titles and transitions to enhance the storytelling aspect of your timelapse. Export your final video in a suitable format and resolution for your intended platform.
Sharing Your Timelapse Creation
Sharing your meticulously crafted total eclipse timelapse deserves a strategic approach to maximize its reach and impact. Consider your audience, the platforms best suited for your video, and how you’ll encourage engagement. A well-executed sharing plan will ensure your stunning work is appreciated by a wide audience, from fellow astrophotographers to the general public fascinated by celestial events.
Successfully sharing your timelapse involves choosing the right platforms, crafting a compelling description, and actively soliciting feedback. Each step plays a vital role in ensuring your hard work gains the recognition it deserves and contributes to the broader appreciation of scientific phenomena.
Platform Selection and Social Media Strategies
Effective dissemination requires a multi-pronged approach. YouTube, Vimeo, and Instagram are popular choices for sharing video content. YouTube, with its vast reach, is ideal for longer, higher-resolution timelapses. Vimeo, known for its quality focus, might be preferred for a more discerning audience. Instagram, with its visually-driven format, allows for shorter, more impactful snippets to entice viewers to explore the full video elsewhere. Consider cross-posting your video across these platforms, tailoring your descriptions to each platform’s audience and conventions. Utilize relevant hashtags on each platform (#solareclipse, #timelapse, #astrophotography, #eclipse2025, etc.) to increase discoverability. Engaging with comments and responding to viewers’ questions builds community and encourages further interaction.
Timelapse Video Description
A captivating description is crucial for attracting viewers. Begin with a concise and engaging title that accurately reflects the content. For example: “Total Solar Eclipse 2025: A Timelapse Journey Across [Location]”. The description should then highlight the key features of your timelapse. Describe the location, the duration of the eclipse captured, and any unique aspects of your footage (e.g., cloud formations, unusual atmospheric effects). Mention the equipment used if you wish to share technical details with your audience. Finally, include a call to action, encouraging viewers to like, comment, and share the video. For example, “Share this awe-inspiring view of nature’s spectacle with your friends!” or “Let us know your favorite moment in the comments below!” Remember to mention any relevant scientific aspects of the eclipse visible in the timelapse.
Feedback Collection Methods
Actively seeking feedback is essential for improvement and future projects. Enable comments on your chosen video platform. Include a clear call to action in your video description, encouraging viewers to share their thoughts. Consider adding a brief survey linked in your description to gather more structured feedback on aspects like video quality, visual appeal, and overall impact. You might ask viewers to rate their experience, suggest improvements, or share their favorite parts of the timelapse. Engaging with the feedback you receive shows viewers you value their opinions and demonstrates your commitment to creating high-quality content. Analyzing the feedback can inform your future timelapse projects, allowing you to refine your techniques and better meet audience expectations.
Frequently Asked Questions (FAQs)
This section addresses common questions regarding the planning and execution of a timelapse of the 2025 total solar eclipse. We’ll cover camera choices, necessary filters, ideal viewing locations, and the duration of the event itself. This information should help you prepare for a successful and safe eclipse photography experience.
Best Camera for Timelapse Photography of a Total Solar Eclipse
Choosing the right camera is crucial for capturing the dynamic range and detail of a total solar eclipse. Several factors influence this decision, including sensor size, dynamic range, and video capabilities. Larger sensors generally offer better low-light performance and shallower depth of field, beneficial for capturing the corona during totality. High dynamic range is essential to record both the bright sun and the darker surrounding sky. Finally, reliable video capabilities are needed for smooth timelapse creation. A comparison of suitable camera options follows:
| Camera Model | Sensor Size | Dynamic Range | Video Capabilities | Pros | Cons |
|---|---|---|---|---|---|
| Canon EOS R5 | Full-frame | Excellent | 8K video | High resolution, excellent dynamic range, robust video capabilities. | Expensive |
| Sony a7S III | Full-frame | Excellent | 4K 120fps video | Exceptional low-light performance, high frame rate for smooth slow motion. | More expensive than APS-C options |
| Nikon Z6 II | Full-frame | Good | 4K video | Reliable performance, good image quality. | Slightly lower dynamic range than Sony a7S III or Canon EOS R5. |
| Canon EOS Rebel T8i | APS-C | Good | 4K video | Affordable, good image quality for the price. | Smaller sensor compared to full-frame options. |
Solar Filters for Safe Sun Photography
Protecting your eyes and equipment is paramount when photographing the sun. Never look directly at the sun without proper eye protection. Similarly, using appropriate filters on your camera lens is crucial to prevent damage to your sensor. Several types of solar filters exist:
- Glass Solar Filters: These are highly recommended for their reliability and optical quality. They are designed to significantly reduce the intensity of sunlight reaching your camera’s sensor.
- Mylar Solar Filters: These are thin sheets of specially coated polyester. They are more affordable than glass filters but are less durable and should be carefully inspected for any damage before use.
- Solar Film: This is a thin, black polymer film that can be attached to a lens. It’s generally less expensive than glass or Mylar filters, but its durability and optical quality can vary.
It’s crucial to ensure that any filter you use is specifically designed for solar observation and meets ISO 12312-2 safety standards. Improper filters can cause irreparable damage to your camera’s sensor and could lead to serious eye injury.
Best Locations to View the 2025 Total Solar Eclipse
The path of totality for the 2025 total solar eclipse crosses several regions, each offering unique viewing opportunities. Factors like weather patterns, accessibility, and expected crowd sizes should inform your location choice.
| Location | Weather Conditions | Accessibility | Expected Crowd Levels |
|---|---|---|---|
| North America (Specific location to be determined based on path of totality) | Variable, check local forecasts closer to the date | Generally good, depending on specific location | Potentially high, plan ahead |
| Central America (Specific location to be determined based on path of totality) | Generally warm and sunny, but prone to rain showers | Variable, check accessibility of chosen location | Potentially moderate |
| South America (Specific location to be determined based on path of totality) | Variable, depending on specific location and time of year | Variable, check accessibility of chosen location | Potentially lower than North America |
| Atlantic Ocean (Specific location to be determined based on path of totality) | Subject to maritime weather patterns | Requires a boat or cruise ship | Likely low |
Note: Specific locations within these regions will be optimal based on the exact path of totality and are subject to change. Consult eclipse prediction websites closer to the event date for precise information.
Duration of a Total Solar Eclipse
The duration of totality—the period when the sun is completely obscured by the moon—varies depending on the location. The entire eclipse event, from the first contact to the last, is considerably longer.
| Location (Example) | Duration of Totality | Total Eclipse Duration |
|---|---|---|
| Location A (within path of totality) | 2 minutes 30 seconds | Approximately 3 hours |
| Location B (within path of totality) | 4 minutes 15 seconds | Approximately 3 hours 15 minutes |
| Location C (outside path of totality, partial eclipse) | 0 minutes (partial eclipse only) | Approximately 1 hour 30 minutes |
Note: These durations are estimates and can vary slightly based on the precise location and the accuracy of eclipse prediction models. The exact durations for specific locations will be available closer to the event from reputable astronomical sources.
Illustrative Examples
Witnessing a total solar eclipse is an experience that transcends mere observation; it’s a visceral engagement with the cosmos. The visual spectacle unfolds in stages, each more breathtaking than the last. This section will explore the sensory and visual aspects of a total solar eclipse, followed by a practical guide to timelapse setup.
Total Eclipse 2025 Timelapse – As the moon slowly encroaches upon the sun, a noticeable change in the ambient light occurs. The sky subtly dims, taking on an eerie, twilight quality. Shadows become sharper, more defined, and seem to stretch unnaturally long. Birds may fall silent, and animals may exhibit unusual behavior, sensing the shift in the natural rhythm of day and night. The sun, progressively crescent-shaped, casts a series of increasingly dramatic shadows – the effect is often described as “crepuscular rays”. Then, as totality approaches, a strange, 360-degree twilight descends. The temperature drops noticeably, a palpable chill in the air, despite the summer heat. The remaining sliver of the sun is a blinding crescent, then, in a blink, it’s gone.
The Corona’s Appearance
The sudden darkness of totality reveals the sun’s corona, a pearly white halo of plasma extending millions of kilometers into space. This ethereal spectacle is the defining feature of a total solar eclipse. The corona’s structure is complex and dynamic, with streamers and plumes of light radiating outwards from the sun’s surface. Its delicate structure, visible only during totality, is a testament to the sun’s immense power and beauty. Variations in the corona’s appearance depend on the sun’s activity cycle; sometimes it’s more structured with prominent streamers, and other times it appears smoother and less defined. The corona’s subtle variations in brightness and texture are captivating, a breathtaking display of celestial artistry.
Dramatic Shifts in Temperature and Light, Total Eclipse 2025 Timelapse
The transition from partial eclipse to totality is marked by a dramatic drop in temperature. The air noticeably cools, sometimes by several degrees Celsius in a matter of minutes. This sudden temperature change is a striking sensory experience, underscoring the sun’s significant impact on our planet’s immediate environment. The shift in ambient light is equally dramatic. The bright, sunny day transforms into a deep twilight, with the sky darkening to a deep blue or even purplish hue. This rapid change in light levels can be unsettling yet awe-inspiring, a potent reminder of the sun’s power and our place within the vastness of space. The experience is further enhanced by the appearance of stars and planets, visible against the darkened sky during the brief period of totality.
Timelapse Camera Setup for an Eclipse
Setting up a timelapse camera for a total solar eclipse requires careful planning and execution to capture the event’s dynamic progression. The following steps Artikel a practical approach. First, choose a stable tripod and a location with a clear view of the eclipse path. Then, secure your camera to the tripod, ensuring it’s level and firmly mounted. Next, select a wide-angle lens to capture the entire scene. For optimal results, use a neutral density filter to reduce the intensity of sunlight during the partial phases, protecting your camera’s sensor and avoiding overexposure. Finally, set your camera to intervalometer mode, specifying the desired interval between shots. This interval depends on the desired frame rate of the final timelapse, usually ranging from 5 to 30 seconds. Remember to test your setup thoroughly before the eclipse to ensure everything functions smoothly. During the eclipse, carefully monitor the battery life and memory card capacity to avoid interruptions. Consider using an external power source and extra memory cards for extended shooting.
Capturing the totality of the 2025 Total Eclipse Timelapse will require careful planning, especially regarding location. To ensure you’re in the path of totality, it’s crucial to know if your desired viewing spot will actually experience the full eclipse; check out this helpful resource to find out if North Carolina will be a good location: Will Nc See The Total Eclipse 2025.
Knowing this beforehand is key to creating a stunning Total Eclipse 2025 Timelapse video.
A Total Eclipse 2025 Timelapse video would be incredible, capturing the celestial event’s progression across the landscape. To fully appreciate the scope of the eclipse, it’s helpful to know which specific locations will experience totality; a comprehensive list can be found on this website detailing Towns In Total Eclipse 2025. Understanding these locations enhances the context and impact of any Total Eclipse 2025 Timelapse footage.
Capturing a Total Eclipse 2025 timelapse requires careful planning, especially considering the optimal viewing locations. To maximize your chances of a stunning shot, you’ll want to find the best viewing spot, which you can research by visiting this helpful resource: Best Place To See The Total Eclipse 2025. Once you’ve secured your location, you can focus on perfecting your timelapse settings for an unforgettable celestial record.
Capturing a Total Eclipse 2025 Timelapse requires careful planning, especially considering the duration of totality. To maximize your timelapse footage, understanding the path of the eclipse is crucial; you’ll want to find a location within the path of the Longest Total Solar Eclipse 2025 , which will provide the most extended period of darkness. This will allow for a truly spectacular and comprehensive Total Eclipse 2025 Timelapse.
Capturing the totality of a solar eclipse in a timelapse offers a unique perspective on this celestial event. For those seeking a broader collection of footage, you might want to check out the extensive video library available on Total Eclipse 2025 Youtube , which can provide additional context for understanding the nuances of a timelapse. Ultimately, both methods offer compelling ways to appreciate the breathtaking spectacle of a Total Eclipse 2025 Timelapse.