Total Eclipse 2025 Photo

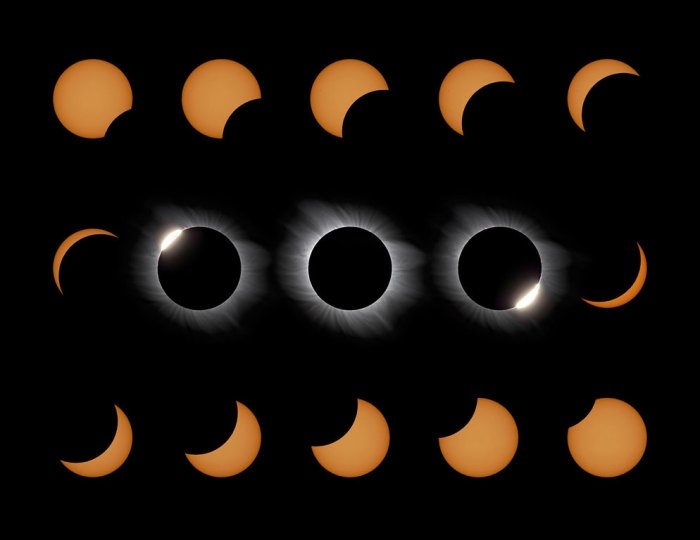
Capturing a total solar eclipse photographically presents a unique set of challenges due to the dynamic nature of the event and the extreme range of brightness involved. From the intensely bright sun to the relatively dark sky surrounding the corona, achieving a well-exposed and detailed image requires careful planning and the right equipment. The fleeting nature of totality, often lasting only a few minutes, necessitates preparedness and a practiced approach.
Photographic Challenges of a Total Solar Eclipse
The primary challenge lies in the vast dynamic range of light levels. The sun’s corona, though seemingly faint, is significantly brighter than the surrounding sky during totality. Accurate exposure requires careful balancing to capture detail in both the corona and the sky’s background. Additionally, the rapid changes in light levels during the partial phases and the quick transition to and from totality demand fast reactions and precise camera settings adjustments. Precise timing is crucial to capture the fleeting diamond ring effect and shadow bands.
Necessary Equipment for Eclipse Photography
Photographing a total solar eclipse requires specialized equipment to protect both the photographer’s eyes and the camera’s sensor. A high-quality DSLR or mirrorless camera with manual control is essential. Crucially, a telephoto lens with a focal length of at least 400mm is recommended for capturing detailed images of the corona; longer focal lengths (800mm or more) will provide even greater magnification. Solar filters are absolutely mandatory for all phases except totality. A high-quality solar filter, specifically designed for astrophotography, must be securely attached to the front of the lens to prevent damage to the camera sensor and the photographer’s eyes. A sturdy tripod is crucial for stability, especially with longer lenses. A remote shutter release will minimize camera shake.
Photographic Techniques for Capturing Eclipse Phenomena
Several techniques can enhance the capture of different eclipse phases. For the corona, a relatively short exposure time (a few seconds) at a low ISO is usually sufficient, balancing the brightness of the corona with the darkness of the sky. The diamond ring effect, a brief moment before and after totality, requires a fast shutter speed to freeze the bright sunlight. Capturing shadow bands, fleeting wave-like patterns on the ground before and after totality, requires a wide-angle lens and a very short exposure time. A series of exposures at varying settings will ensure capturing the best image of each phenomenon.
Step-by-Step Guide for Photographing the Total Eclipse
1. Safety First: Never look directly at the sun without proper eye protection. Use certified solar eclipse glasses or a solar filter on your camera at all times except during the brief period of totality.
2. Equipment Setup: Set up your camera and tripod in a stable location with a clear view of the horizon. Attach the solar filter to your lens.
3. Practice Shots: Before the eclipse, take test shots to determine the optimal settings for your equipment and lighting conditions.
4. Partial Phases: Capture images of the partial phases using the solar filter. Vary exposure settings to capture different levels of detail.
5. Totality: Remove the solar filter only during the brief period of totality. Quickly adjust your camera settings for the corona and capture multiple images.
6. Post-Totality: Reattach the solar filter immediately after totality and continue capturing images of the partial phases.
7. Review and Process: Review your images and process them using photo editing software.
Comparison of Image Formats for Eclipse Photography, Total Eclipse 2025 Photo
Choosing the right image format is critical for optimal image quality and post-processing capabilities. RAW and JPEG are the most common choices.
| Format | File Size | Editing Capabilities | Storage Considerations |
|---|---|---|---|
| RAW | Large | Extensive; allows for significant adjustments to exposure, white balance, and other parameters. | Requires significant storage space; slower processing times. |
| JPEG | Small | Limited; less flexibility in post-processing. | Requires less storage space; faster processing times. |
Post-Processing Your Total Eclipse 2025 Photos
Capturing a total solar eclipse is a momentous occasion, but the work doesn’t end with pressing the shutter. Post-processing is crucial for transforming your raw images into stunning representations of this celestial event, revealing details often lost in the camera’s initial capture. Proper editing techniques can enhance the drama and beauty of your eclipse photographs, making them truly memorable.
Total Eclipse 2025 Photo – Post-processing your eclipse photos involves a series of steps aimed at improving contrast, color, sharpness, and overall image quality. This often involves utilizing specialized software designed for astrophotography, as these programs offer tools specifically tailored for handling the unique challenges presented by low-light celestial photography. The process balances enhancing the details of the corona and the subtle gradations of light and shadow while minimizing noise and artifacts.
Enhancing Contrast, Color, and Sharpness
Several techniques can be employed to enhance the visual appeal of your eclipse images. Adjusting contrast helps to separate the bright corona from the darker sky, making the details of the solar atmosphere more prominent. Similarly, fine-tuning color saturation can bring out the subtle hues within the corona, often displaying shades of white, yellow, and even pink. Sharpening techniques can improve the definition of the corona’s intricate structures and filaments, although over-sharpening should be avoided to prevent the introduction of artifacts. These adjustments are typically made using the curves, levels, and sharpening tools found in most image editing software. For example, in Adobe Photoshop, the curves tool allows for precise control over the tonal range of the image, while the Unsharp Mask filter provides a controllable sharpening effect.
Image Stacking for Noise Reduction and Clarity
Stacking multiple images of the same eclipse phase is a powerful technique for improving image quality. By aligning and averaging numerous exposures, noise is significantly reduced, resulting in a cleaner, more detailed final image. This is particularly useful when shooting at high ISO settings, where noise is more prominent. Software such as Sequator or RegiStax is specifically designed for image stacking and alignment, automating the process and optimizing the results. For instance, if you captured 20 images of the total eclipse phase, stacking them will average out random noise present in individual shots, producing a much clearer and more detailed image of the corona.
Utilizing Specialized Astrophotography Software
Software designed for astrophotography provides tools specifically tailored to process images of celestial events. These programs often include features for calibration, noise reduction, and advanced image processing techniques that are not readily available in general-purpose image editors. Examples of such software include PixInsight, AstroPixelProcessor, and DeepSkyStacker. These programs allow for more precise control over various aspects of the image processing workflow, such as background subtraction, color calibration, and deconvolution, which is a technique used to enhance the sharpness of images. PixInsight, for instance, offers powerful tools for noise reduction, dynamic range compression, and color correction, ideal for bringing out the subtleties in an eclipse image.
Adjusting White Balance and Exposure
Accurate white balance is critical for rendering the true colors of the eclipse. Incorrect white balance can lead to images that appear too warm (yellowish) or too cool (bluish). The white balance should be set appropriately during the shooting process, but it can also be adjusted in post-processing. Similarly, proper exposure is essential for capturing the details in both the bright corona and the darker sky. Using tools like histograms and exposure adjustments, one can fine-tune the exposure to optimize the dynamic range of the image, preventing clipping of highlights or shadows. For example, in Lightroom, one can adjust the white balance using the white balance tool or by selecting a custom white balance point in the image.
Avoiding Common Post-Processing Mistakes
Over-processing is a common pitfall. Excessive sharpening can lead to halos and artifacts, while over-saturation can result in unnatural and unrealistic colors. Another mistake is neglecting proper calibration and background subtraction, which can leave residual noise and artifacts in the final image. Finally, failing to properly align images before stacking can lead to blurry and distorted results. By carefully considering these points and practicing restraint, one can avoid these common pitfalls and achieve optimal results in their post-processing workflow.
Sharing Your Total Eclipse 2025 Photography
Capturing the majesty of a total solar eclipse is a significant achievement, but the journey doesn’t end with the last click of your camera shutter. Sharing your breathtaking images effectively allows you to connect with fellow enthusiasts, preserve your memories, and potentially inspire others to witness the wonder of a total eclipse. This section explores strategies for effectively sharing your eclipse photography.
Sharing your eclipse photographs effectively involves crafting a compelling narrative, choosing appropriate platforms, and understanding copyright considerations. A well-planned approach will maximize the impact of your work and ensure its longevity.
Compelling Narratives for Eclipse Photographs
A captivating narrative elevates your photographs beyond mere images. For social media posts, consider starting with a concise, evocative sentence that immediately grabs attention, such as “Witnessing the crown of the sun, a moment etched in time.” Follow this with a brief description of your experience, emphasizing the emotional impact of the eclipse and any unique aspects of your viewing location. For a personal blog, you can expand on this narrative, adding more detail about your preparations, the atmosphere of the event, and your personal reflections. Consider incorporating technical details about your equipment and shooting process, demonstrating your expertise and providing value to your audience. For example, you could mention, “Captured this shot using a Canon EOS R5 with a 600mm lens, employing a specific stacking technique to enhance detail in the corona.”
Effective Showcase of Eclipse Photos in a Portfolio or Online Gallery
A well-organized portfolio or online gallery presents your work professionally. Organize your images thematically, perhaps grouping shots by phases of the eclipse (partial, totality, diamond ring). Use high-resolution images and consider including a brief caption for each photo, providing context and technical details. Platforms like Flickr, SmugMug, and even dedicated websites offer excellent tools for creating visually appealing galleries. Consider adding a short introduction to your gallery, explaining your photographic approach and the story behind your eclipse journey. For instance, you could highlight the challenges you overcame or the unique perspective your photos offer.
Engaging with Other Astrophotographers and Sharing Your Work
The astrophotography community is incredibly supportive. Engage with other photographers by joining online forums, attending workshops, or participating in social media discussions using relevant hashtags like #solareclipse2025 #astrophotography. Share your work, offer constructive criticism, and ask for feedback. This interaction fosters collaboration and provides valuable learning opportunities. Consider entering your images into astrophotography competitions to gain exposure and recognition. Participating in online communities allows you to learn from experienced photographers and potentially collaborate on future projects.
Copyright Protection and Responsible Image Sharing
Protecting your copyright is crucial. Always watermark your images with a subtle yet visible mark. Understand the terms of service of any platform you use, and be mindful of how you license your work. Avoid sharing high-resolution images freely on public platforms unless you explicitly want them to be used without attribution. Consider using Creative Commons licenses to specify how your work can be used, ensuring you maintain control over your intellectual property. Be aware of image theft and take steps to prevent it. Regularly monitor your images online and report any unauthorized use.
Optimizing Images for Various Online Platforms
Different platforms have different requirements for image size and format. Instagram favors square or vertical images with a lower resolution, while Flickr allows for larger files. Before uploading, resize and compress your images appropriately to optimize loading times and maintain image quality. For Instagram, consider using editing apps to enhance your photos further, applying filters that complement the natural colors of the eclipse. For Flickr, you can upload larger, higher-resolution files, offering viewers a more detailed viewing experience. Always check the specific guidelines for each platform before uploading.
Capturing the perfect Total Eclipse 2025 Photo will be a memorable experience for many. Planning ahead is key, and knowing when the next opportunity will arise is helpful; you can find information on the Next Total Solar Eclipse After 2025 In Usa to start your preparations. This will help you refine your photographic approach for the 2025 event and ensure you’re ready to capture stunning images.
Remember to prioritize safety when photographing the Total Eclipse 2025 Photo.
Capturing the perfect Total Eclipse 2025 Photo will be a memorable experience for any astrophotographer. Planning ahead is key, and knowing when the next celestial event occurs is crucial for future preparations. To find out when you can start planning for your next eclipse viewing, check this helpful resource: When Is The Next Total Eclipse After 2025.
This information will help you anticipate the best time to start researching locations and equipment for your Total Eclipse 2025 Photo endeavor.
Capturing the perfect Total Eclipse 2025 Photo requires careful planning, and knowing the precise timing is crucial. To ensure you’re in the right place at the right moment, check the exact eclipse times for your location; for Florida residents, this information is readily available at Total Eclipse 2025 Time Florida. With the correct timing, you can then concentrate on composing your stunning Total Eclipse 2025 Photo.
Capturing the perfect Total Eclipse 2025 Photo requires careful planning, and knowing the precise timing is crucial. To ensure you’re in the right place at the right moment, check the exact eclipse times for your location; for Florida residents, this information is readily available at Total Eclipse 2025 Time Florida. With the correct timing, you can then concentrate on composing your stunning Total Eclipse 2025 Photo.
Capturing the perfect Total Eclipse 2025 Photo requires careful planning, and knowing the precise timing is crucial. To ensure you’re in the right place at the right moment, check the exact eclipse times for your location; for Florida residents, this information is readily available at Total Eclipse 2025 Time Florida. With the correct timing, you can then concentrate on composing your stunning Total Eclipse 2025 Photo.