Total Eclipse 2025 Photography
Capturing a total solar eclipse is a rewarding photographic challenge, demanding careful planning and the right equipment. This guide Artikels the essential steps to ensure you successfully capture this awe-inspiring celestial event.
Essential Equipment for Eclipse Photography
Photographing a total solar eclipse requires specialized equipment to protect your eyes and camera, and to capture the dynamic range of light changes during the event. Inexpensive equipment may not suffice, and investment in high-quality gear is recommended for optimal results.
- Camera Body: A DSLR or mirrorless camera with manual controls is essential for precise exposure adjustments. A camera with good low-light performance is beneficial for capturing the dim light during totality. Full-frame cameras offer superior image quality and low-light capabilities.
- Lenses: A wide-angle lens (14-24mm) is ideal for capturing the landscape context of the eclipse, while a telephoto lens (at least 400mm, ideally 800mm or more) is crucial for detailed shots of the sun’s corona. Consider using a teleconverter to extend the reach of your telephoto lens.
- Filters: Solar filters are absolutely crucial for protecting your eyes and camera equipment during all phases of the eclipse *except* totality. Using an unfiltered lens to look at the sun, even briefly, can cause permanent eye damage. High-quality solar filters, such as those made of Baader AstroSolar film or glass, should be securely attached to the front of your lens. These filters significantly reduce the intensity of the sunlight, allowing safe observation and photography. Improper filters can damage your camera sensor.
- Tripod: A sturdy tripod is essential for maintaining stability, especially when using long telephoto lenses. A remote shutter release is highly recommended to avoid camera shake.
Pre-Eclipse Planning: Location, Weather, and Travel
Thorough planning is key to a successful eclipse photography expedition. Factors such as location, weather, and travel arrangements should be meticulously addressed well in advance.
- Location Scouting: Research the eclipse path and identify locations with clear skies and minimal light pollution. Consider factors such as accessibility, accommodation availability, and potential crowds. Websites and apps dedicated to eclipse prediction provide valuable resources for determining the path of totality and optimal viewing locations.
- Weather Forecasting: Monitor weather forecasts leading up to the eclipse. Cloudy conditions can severely hinder your photographic efforts. Having backup locations in mind is crucial, allowing for flexibility if the weather deteriorates at your primary location.
- Travel Arrangements: Book flights and accommodation well in advance, especially if traveling to a remote location. Consider transportation to and from your chosen viewing spot. Allow ample time for travel and potential delays.
Understanding the Eclipse Path and Timing, Total Eclipse 2025 Photography
Precise knowledge of the eclipse path and timing is vital for optimal photography. The path of totality, where the moon completely blocks the sun, is relatively narrow. Missing the precise timing will result in missed photographic opportunities.
Knowing the exact start and end times of totality, as well as the duration of totality, is crucial for planning your shots.
The duration of totality varies depending on location. Some locations might only experience a few seconds of totality, while others might have several minutes. Planning your shots around the various phases (partial eclipse, totality, and partial eclipse) is essential for capturing the entire event.
Eclipse Photography Expedition Checklist
A comprehensive checklist ensures you don’t forget essential items.
- Camera body and lenses
- Solar filters (for all phases except totality)
- Tripod and remote shutter release
- Extra batteries and memory cards
- Cleaning supplies for lenses and filters
- Weather-appropriate clothing
- Headlamp or flashlight
- Snacks and water
- Map of the eclipse viewing area
- Copies of important documents
Capturing the Diamond Ring and Corona
Photographing a total solar eclipse presents a unique set of challenges, particularly when aiming to capture the fleeting beauty of the diamond ring effect and the ethereal glow of the solar corona. These moments are incredibly brief, demanding precise timing, accurate exposure, and a solid understanding of your equipment. The intense brightness differences between the sun and its surroundings further complicate the process.
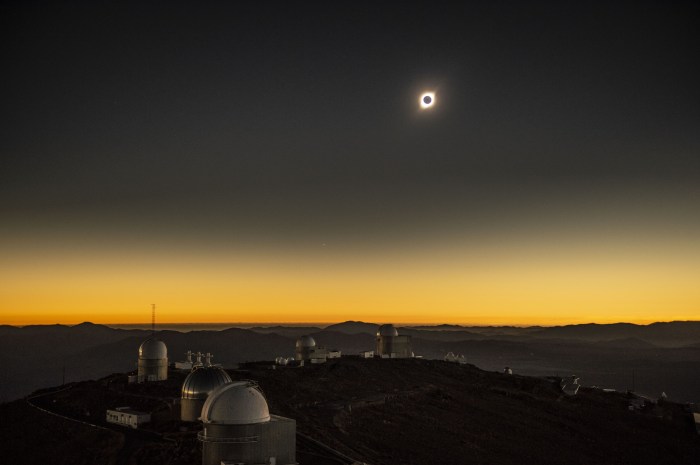
The diamond ring effect, occurring just before and after totality, is a spectacular sight where a bright point of sunlight shines through valleys on the moon’s edge, resembling a diamond. Simultaneously, the corona, the sun’s outer atmosphere, becomes visible, a delicate halo of light extending millions of kilometers into space. Capturing both requires careful planning and execution.
Camera Settings and Shooting Modes
Achieving sharp focus and proper exposure for the diamond ring and corona requires careful consideration of your camera settings. Manual mode (M) offers the greatest control, allowing you to independently adjust aperture, shutter speed, and ISO. A fast shutter speed (around 1/8000th to 1/4000th of a second) is crucial to freeze the motion of the diamond ring and prevent overexposure. A narrow aperture (f/8 to f/16) will enhance sharpness and depth of field, ensuring both the ring and surrounding sky are in focus. The ISO should be kept as low as possible (ISO 100-400) to minimize noise while maintaining sufficient light sensitivity. Using a tripod is essential for stability, and a remote shutter release helps prevent camera shake.
Focusing and Exposure Techniques
Precise focusing is paramount. Autofocus may struggle in the low-light conditions of totality, so manual focusing is recommended. Focus on a bright object near the sun just before the diamond ring appears; this should maintain approximate focus for the brief event. Exposure is equally crucial. Bracketing your exposures is highly recommended. Take several shots at different shutter speeds and apertures to ensure you capture the best possible image, accounting for the dynamic range of the scene. Metering should ideally be spot metering, focusing on the brightest part of the sun. Remember, the corona is significantly fainter than the diamond ring, so adjust your settings accordingly for each.
Shooting Schedule for Eclipse Phases
A well-planned shooting schedule is vital. The following is a sample schedule, adjusted based on the specific duration of totality at your location:
| Time Before Totality | Phase | Camera Settings Suggestion | Notes |
|---|---|---|---|
| 5 minutes | Partial Eclipse Begins | Aperture Priority (Av) or Manual (M), Low ISO, moderate shutter speed | Use a neutral density filter to protect your camera and eyes. |
| 1 minute | Diamond Ring (first appearance) | Manual (M), High shutter speed (1/8000-1/4000), narrow aperture (f/8-f/16), low ISO | Rapid sequence shooting is recommended. |
| Totality | Corona | Manual (M), Vary shutter speed and aperture to capture different aspects of the corona, low ISO | Experiment with exposure to capture both bright and faint details. |
| 1 minute | Diamond Ring (second appearance) | Manual (M), High shutter speed (1/8000-1/4000), narrow aperture (f/8-f/16), low ISO | Rapid sequence shooting is recommended. |
| 5 minutes | Partial Eclipse Ends | Aperture Priority (Av) or Manual (M), Low ISO, moderate shutter speed | Remove neutral density filter. |
Remember that these settings are suggestions; you may need to adjust them based on the specific conditions of the eclipse and your equipment. Practice beforehand to ensure you are comfortable with your camera and settings. The most important aspect is to enjoy the experience and capture the awe-inspiring spectacle of a total solar eclipse!
Photographing the Partial Phases
The partial phases of a solar eclipse, while not as dramatic as totality, offer unique photographic opportunities. Capturing the subtle shifts in sunlight and the crescent shape of the sun requires careful planning and execution. The following details methods for successfully photographing these phases, highlighting techniques to enhance their visual appeal.
Total Eclipse 2025 Photography – The partial phases provide a longer window for capturing images, allowing for experimentation with different techniques and compositions. The gradual obscuration of the sun presents a dynamic subject, with the light and shadows changing constantly. This necessitates adapting your photographic approach to account for these fluctuations.
Capturing the perfect shot of the Total Eclipse 2025 will require careful planning and the right equipment. However, some believe the event is shrouded in mystery, fueling various theories; you can explore these intriguing claims on the website dedicated to Total Eclipse 2025 Conspiracies. Regardless of such speculation, the photographic opportunities presented by this celestial event remain incredibly exciting, promising stunning images for those prepared to capture them.
Methods for Capturing Subtle Light Changes During Partial Phases
Precise exposure is paramount during the partial phases. The sun’s intensity changes continuously as the moon moves across its face. Bracketing your exposures – taking a series of shots at slightly different exposure settings – is crucial to ensure you capture a correctly exposed image. This involves taking a series of shots, varying the shutter speed or aperture slightly between each shot. For example, you might take three shots: one at your calculated exposure, one slightly underexposed, and one slightly overexposed. Reviewing these images later will allow you to select the best exposed image. Additionally, shooting in RAW format allows for greater flexibility in post-processing, enabling you to adjust exposure and other parameters without significant loss of image quality. Careful monitoring of your histogram is also vital, ensuring that your image data isn’t clipped in either the highlights or shadows.
Comparison of Photographic Techniques for Enhancing Partial Eclipse Images
Several techniques can enhance the visual impact of partial eclipse images. Using a telephoto lens significantly magnifies the partially eclipsed sun, making the crescent shape more prominent. However, simply magnifying the sun might result in a visually uninteresting image. Consider incorporating elements of the surrounding landscape into your composition to add context and depth. This could involve including trees, buildings, or other foreground elements that frame the partially eclipsed sun. Another technique is to use a longer exposure to capture the subtle changes in light and shadow across the landscape. This can create a more dramatic and atmospheric image. However, remember that overexposure needs to be carefully avoided. Contrast this with short exposure times which “freeze” the sun’s shape, providing a sharp and detailed representation of the partially eclipsed sun. The choice between these techniques depends on the desired aesthetic effect.
Effective Filter Use for Protection and Detail Capture
Solar filters are absolutely essential for protecting your camera equipment and your eyes when photographing the sun. Never look directly at the sun without proper eye protection, and never point your camera at the sun without a solar filter attached to the front of the lens. A solar filter reduces the intensity of the sunlight, preventing damage to your camera’s sensor and allowing you to capture detailed images of the partially eclipsed sun. Different types of solar filters exist, including those made from specialized solar film or glass. Ensure your filter is specifically designed for solar observation and meets the ISO 12312-2 safety standard. Improper filters can cause irreparable damage to your equipment and pose a serious risk to your vision.
Creative Compositions Showcasing the Environment During Partial Phases
Creative compositions can transform simple images of the partially eclipsed sun into compelling works of art. Instead of simply capturing the sun alone, consider incorporating the environment into your frame. For instance, an image of the partially eclipsed sun peeking through the branches of a tree can create a striking contrast between the celestial event and the earthly landscape. Similarly, capturing the sun setting or rising behind a mountain range, with the partial eclipse visible, can create a breathtaking panoramic view. These compositional choices enhance the narrative and visual interest of your photographs. Consider the use of leading lines, such as roads or rivers, to draw the viewer’s eye to the partially eclipsed sun. Experiment with different perspectives and angles to find unique and captivating compositions.
Post-Processing Techniques
Post-processing is crucial for transforming your raw eclipse images into stunning visuals. The dynamic range of the sun’s corona and the dramatic shadows cast during totality demand careful adjustments to reveal the full beauty of the event. This section Artikels a workflow for processing your eclipse photographs, covering exposure, contrast, color correction, noise reduction, and highlight/shadow manipulation. We’ll also explore relevant software options.
A robust workflow ensures consistent and high-quality results. It’s essential to work non-destructively, preserving your original image data for future adjustments. This approach allows for experimentation and refinement without compromising the original file.
Capturing the perfect shot of the Total Eclipse 2025 will require careful planning and the right equipment. However, some believe the event is shrouded in mystery, fueling various theories; you can explore these intriguing claims on the website dedicated to Total Eclipse 2025 Conspiracies. Regardless of such speculation, the photographic opportunities presented by this celestial event remain incredibly exciting, promising stunning images for those prepared to capture them.
Exposure Adjustment
Correct exposure is fundamental. Eclipse images often exhibit a vast range of brightness, from the intensely bright sun to the relatively dark surroundings. Raw files offer the greatest flexibility for exposure correction. Software like Adobe Lightroom or Capture One allows for precise adjustments to the exposure slider, recovering detail in both highlights and shadows without introducing significant noise. For example, you might need to slightly underexpose the bright corona to avoid clipping highlights while simultaneously brightening the darker areas to reveal subtle details. Fine-tuning the exposure requires careful observation of the image histogram to identify clipped highlights (pure white) or blocked shadows (pure black).
Contrast and Color Correction
After adjusting exposure, focus on contrast and color. The contrast slider in your chosen software will help to separate the bright corona from the darker sky. However, be mindful of not over-sharpening the image, which can lead to unnatural artifacts. Color correction might be needed to adjust white balance, ensuring accurate representation of colors. For example, the corona may appear slightly bluish or reddish depending on atmospheric conditions; fine adjustments can enhance the natural colors.
Noise Reduction and Artifact Removal
Digital sensors, especially at high ISO settings often used during eclipse photography, can introduce noise (random speckles) and artifacts (irregular patterns). Dedicated noise reduction tools within photo editing software effectively mitigate this. It’s advisable to apply noise reduction subtly to avoid blurring fine details, particularly in the corona. Many programs offer separate noise reduction for luminance (brightness) and chrominance (color), allowing for more precise control. For instance, applying luminance noise reduction to the sky while leaving the chrominance untouched preserves the natural color vibrancy of the corona.
Highlight and Shadow Enhancement
Highlights and shadows adjustments provide further control over the overall visual impact. By carefully manipulating the highlights slider, you can recover details within the intensely bright areas of the corona without losing overall contrast. Similarly, subtle shadow adjustments can bring out faint details in the darker regions of the image. This is a delicate balance; excessive adjustment in either direction can lead to unnatural-looking results. For example, a careful recovery of shadow detail in the landscape surrounding the eclipse can add depth and context to your final image.
Software and Tools
Numerous software options cater to the specific needs of astrophotography. Adobe Lightroom and Capture One are popular choices offering comprehensive tools for raw file processing, noise reduction, and advanced adjustments. Specialized plugins like Topaz DeNoise AI can further enhance noise reduction capabilities. Consider using layers in your editing software to apply adjustments non-destructively and easily revert changes if needed. Experimentation and practice are key to mastering these tools and achieving optimal results.
Composition and Artistic Approaches
Creating compelling eclipse photographs goes beyond simply capturing the celestial event; it involves thoughtful composition and artistic expression. The best images blend technical proficiency with a strong visual narrative, drawing the viewer into the awe-inspiring spectacle. This section explores various compositional techniques and artistic styles that can elevate your eclipse photography.
Successful eclipse photography hinges on several key compositional elements. Mastering these techniques can transform a simple snapshot into a truly memorable image.
Capturing the perfect shot of the Total Eclipse 2025 will require careful planning and the right equipment. However, some believe the event is shrouded in mystery, fueling various theories; you can explore these intriguing claims on the website dedicated to Total Eclipse 2025 Conspiracies. Regardless of such speculation, the photographic opportunities presented by this celestial event remain incredibly exciting, promising stunning images for those prepared to capture them.
Key Compositional Elements in Eclipse Photography
Effective composition guides the viewer’s eye and enhances the overall impact of the image. Leading lines, for instance, can draw attention towards the eclipsed sun, while a compelling foreground element provides context and scale. Overall balance ensures visual harmony, preventing the image from feeling cluttered or unbalanced. Consider the rule of thirds – placing the sun off-center often creates a more dynamic composition than centering it. The interplay of light and shadow, especially during the partial phases, can also be used to create striking visual effects.
Creative Approaches: Landscapes and Human Elements
Incorporating landscapes or human elements into your eclipse photographs adds depth and narrative. A majestic mountain range silhouetted against the eclipsed sun creates a dramatic contrast, while a person gazing at the event adds a human perspective and scale to the celestial display. For example, an image of a lone figure standing on a windswept cliff, dwarfed by the vastness of the sky during totality, conveys a sense of wonder and solitude far more effectively than a simple shot of the sun alone. Similarly, incorporating architectural landmarks or natural features like trees can provide a sense of place and context, further enriching the narrative of the photograph.
Artistic Styles in Eclipse Photography
Eclipse photography encompasses a wide range of artistic styles, from minimalist depictions focusing solely on the celestial event to expansive landscapes that integrate the eclipse into a broader environmental context. Some photographers favor a stark, realistic approach, emphasizing the scientific accuracy of their images. Others embrace a more impressionistic style, utilizing creative techniques like long exposures or selective focus to create dreamlike or surreal effects. Comparing the works of different photographers reveals the diverse ways in which the same subject can be interpreted and expressed artistically. A comparison of a stark, clinically-perfect image of totality versus a dreamy long exposure showing the corona blurring into a surrounding landscape reveals the breadth of stylistic possibilities.
Safety Precautions During Eclipse Photography: Total Eclipse 2025 Photography
Photographing a total solar eclipse is an incredible experience, but safety must be your top priority. The sun’s intense radiation can cause serious and permanent eye damage, and improper handling of equipment can lead to accidents. This section details the essential safety measures to protect yourself and your equipment during this awe-inspiring event.
Protecting your eyes and equipment is paramount during a solar eclipse. Looking directly at the sun, even during a partial eclipse, can cause severe retinal damage, leading to vision impairment or blindness. Similarly, intense sunlight can damage camera sensors and other equipment. Therefore, employing appropriate safety measures is not optional but absolutely essential.
Eye Protection During Eclipse Observation
Never look directly at the sun without proper eye protection. Even during the brief totality phase of a total solar eclipse, it is crucial to use certified solar filters. Improper filters or homemade solutions can be dangerous and ineffective. The sun’s radiation can cause irreversible damage to your eyes, even during short periods of observation. Always use ISO 12312-2 certified eclipse glasses or viewers. These glasses are specifically designed to filter out harmful solar radiation. Never use regular sunglasses, smoked glass, or other makeshift filters.
Recommended Safety Gear for Eclipse Photography
Prior to the eclipse, assemble the necessary safety gear to ensure a safe and successful photographic experience. This includes:
- ISO 12312-2 certified solar filters for your eyes: These are inexpensive but crucial for protecting your eyesight. They should be worn at all times when the sun is visible, except during the brief period of totality (if you are in the path of totality).
- Solar filters for your camera lens: These filters are specifically designed to reduce the intensity of sunlight reaching your camera’s sensor. They must be securely attached to the front of your lens, ensuring no direct sunlight reaches the lens or sensor without filtration.
- A sturdy tripod: A stable tripod is essential for long exposures required during the eclipse. A shaky camera will result in blurry images, especially during the partial phases.
- Remote shutter release: This prevents camera shake when taking long exposures, leading to sharper images.
- Appropriate clothing: Wear protective clothing, including a hat and sunglasses, to shield yourself from the sun’s rays.
Safe Handling of Cameras and Equipment
Handling your equipment safely is crucial to avoid accidents and damage.
- Always keep your solar filters securely attached to your lenses during the partial phases of the eclipse. Removing them prematurely can instantly damage your equipment.
- Avoid touching the front of your camera lens while it is equipped with a solar filter. Fingerprints can compromise the filter’s effectiveness.
- Use a lens hood to reduce lens flare and improve image quality.
- Plan your camera settings beforehand to minimize adjustments during the eclipse, reducing the risk of accidental exposure to the sun.
- Bring a backup camera and batteries, as the intense heat and sunlight may affect equipment performance.
Dangers of Direct Sun Observation Without Protection
Directly viewing the sun without proper eye protection can cause severe damage to the retina, the light-sensitive tissue at the back of the eye. This damage can lead to solar retinopathy, a condition that can cause blurry vision, blind spots, and in severe cases, permanent vision loss. The damage is often painless and may not be immediately noticeable, but the effects can be devastating and irreversible. The intense ultraviolet and infrared radiation emitted by the sun is the primary cause of this damage. Even brief periods of direct sun exposure without protection can result in significant and lasting harm. For example, looking at the sun during a partial eclipse for even a few seconds without proper eye protection can lead to permanent vision impairment.
Sharing Your Eclipse Photos
Sharing your stunning eclipse photographs is an essential part of the experience. A well-executed sharing strategy can ensure your hard work is appreciated by a wide audience, potentially leading to recognition and even opportunities for further photographic endeavors. This section Artikels effective methods for showcasing your images, both online and in print, along with tips for optimization and captivating descriptions.
Successfully sharing your eclipse photography involves a multi-pronged approach, combining digital distribution with potential print exhibitions or publications. Consider your target audience and the desired impact when selecting your sharing methods.
Online Platforms for Eclipse Photography
Several online platforms are ideal for sharing high-quality eclipse photos. Social media platforms like Instagram, Facebook, and Twitter offer immediate reach to a broad audience. However, platforms dedicated to photography, such as Flickr and 500px, provide a more focused community of photography enthusiasts who can offer constructive criticism and appreciation. Consider creating a dedicated website or blog to showcase your work more comprehensively, allowing for better organization and control over the presentation of your images. Websites like SmugMug or Zenfolio are specifically designed for photographers and offer e-commerce options if you wish to sell prints or digital downloads.
Optimizing Images for Online Sharing
Optimizing your images for online sharing is crucial for both visual appeal and efficient loading times. Resizing your images to appropriate dimensions for each platform is vital. Larger images will take longer to load, potentially leading viewers to abandon the page. Commonly used dimensions for social media vary but often fall within the range of 1080 x 1080 pixels or 1920 x 1080 pixels. Compression is also important; using a lossy compression method like JPEG can significantly reduce file size without a drastic loss of quality, ensuring faster loading times. Tools like Adobe Lightroom or Photoshop provide excellent control over resizing and compression settings. For web use, aiming for a file size under 1-2 MB is generally a good target.
Writing Compelling Captions and Descriptions
Captivating captions and descriptions are essential for enhancing the impact of your eclipse photographs. A simple description stating the location and time of the photograph is useful. However, more engaging captions can transport viewers to the scene. Describe the experience: the atmosphere, the emotions, the sounds, and even the weather. For instance, instead of writing “Total solar eclipse,” try something like, “The world fell silent as the moon completely obscured the sun, casting an eerie twilight over the landscape. The corona blazed with ethereal light.” Use relevant hashtags to increase visibility on social media platforms. Consider adding technical details, such as the camera gear used, exposure settings, and any post-processing techniques employed, for photography enthusiasts.
Avenues for Exhibiting or Publishing Eclipse Photographs
Beyond online sharing, consider exhibiting your photographs in physical spaces or publishing them in publications. Local art galleries or community centers might be open to hosting an exhibition of your eclipse photographs. Submitting your images to photography competitions or contests can also lead to recognition and exposure. Consider approaching astronomy magazines or science publications with your best images; many publications regularly feature astrophotography. Furthermore, creating a high-quality photo book showcasing your eclipse collection could serve as a lasting memento and a beautiful way to share your experience.
Frequently Asked Questions (FAQ)
Planning to photograph the 2025 total solar eclipse? This section addresses common questions to help you prepare for this incredible celestial event. We’ll cover camera choices, safety, settings, post-processing, and finding eclipse path information.
Best Camera for Eclipse Photography
A DSLR or mirrorless camera with interchangeable lenses offers the most versatility for eclipse photography. While a high-end camera provides advantages like better low-light performance and faster autofocus, a more affordable model with manual controls will also suffice. The key is the ability to adjust aperture, shutter speed, and ISO manually. Consider lenses with a focal length ranging from wide-angle (for capturing the landscape during the partial phases) to telephoto (for detailed shots of the sun during totality). A sturdy tripod is essential for sharp images.
Safety Precautions During Eclipse Photography
Never look directly at the sun without proper eye protection, even during partial phases. Serious eye damage can occur. Use certified solar filters specifically designed for eclipse viewing and photography on your camera lens *at all times* except during the brief period of totality. These filters should be ISO 12312-2 compliant. Remove the filter only when the sun is completely obscured by the moon during totality, and replace it immediately afterward. Even a small glimpse of the sun through an unfiltered lens can damage your camera’s sensor.
Camera Settings for a Total Solar Eclipse
During the partial phases, you’ll need to use a solar filter and adjust your camera settings to prevent overexposure. Start with a small aperture (e.g., f/8 or f/11), a fast shutter speed (e.g., 1/2000s or faster), and a low ISO (e.g., ISO 100). These settings will vary depending on your camera, lens, and lighting conditions. During totality, the light dramatically changes. Experiment with a wider aperture (e.g., f/5.6 or f/4), a slower shutter speed (e.g., 1/125s to several seconds), and a lower ISO. The ideal settings will depend on the brightness of the corona. Bracketing your exposures (taking several shots at different settings) is highly recommended.
Post-Processing Eclipse Photos
Post-processing can significantly enhance your eclipse photos. Software like Adobe Photoshop or Lightroom allows for adjustments to brightness, contrast, sharpness, and color balance. Techniques like HDR (High Dynamic Range) imaging can help capture the detail in both the bright and dark areas of your images. Careful attention to noise reduction and sharpening is also important, especially for images taken at higher ISO settings. Remember to maintain the integrity of the image and avoid over-processing.
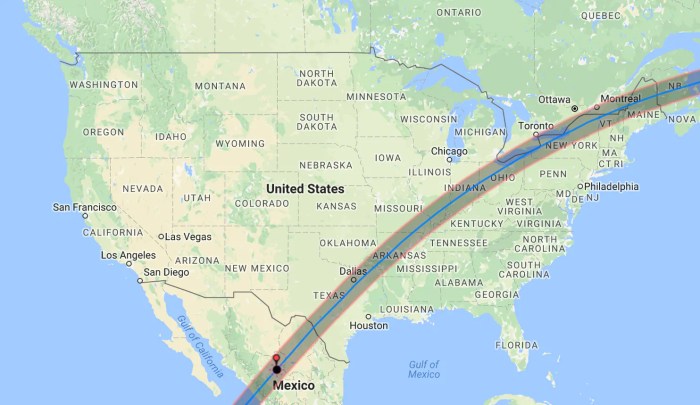
Path of Totality for the 2025 Eclipse
The path of totality for the April 8, 2025, total solar eclipse will traverse North America. Numerous websites and astronomical resources provide detailed maps showing the path of totality, including specific times of the eclipse for different locations. NASA’s website is an excellent source for this information. Planning your viewing location within the path of totality is crucial to experience and photograph the total eclipse. Consider factors such as weather forecasts, accessibility, and potential crowds when choosing a location.
Capturing the perfect shot of the Total Eclipse 2025 will require careful planning and the right equipment. However, some believe the event is shrouded in mystery, fueling various theories; you can explore these intriguing claims on the website dedicated to Total Eclipse 2025 Conspiracies. Regardless of such speculation, the photographic opportunities presented by this celestial event remain incredibly exciting, promising stunning images for those prepared to capture them.
Capturing the breathtaking spectacle of a total solar eclipse requires careful planning and the right equipment. For photographers aiming for stunning shots during the 2025 event, location is key, and Mazatlan presents a fantastic opportunity; check out the details on ideal viewing spots at Total Eclipse 2025 Mazatlan to ensure you’re perfectly positioned. With the right preparation and location, your Total Eclipse 2025 Photography will be unforgettable.