Capturing the Atmosphere
A total solar eclipse offers a unique photographic opportunity, extending far beyond simply capturing the sun’s corona. The event’s atmosphere is charged with a palpable sense of anticipation and awe, a collective experience that significantly impacts the surrounding environment and the emotions of those witnessing it. Successfully capturing this atmosphere requires a multi-faceted approach, incorporating both the celestial event and the human response to it.
The overall ambiance of a total solar eclipse is unlike any other natural phenomenon. As totality approaches, a noticeable drop in temperature occurs, accompanied by an eerie silence that replaces the usual sounds of nature. Animals often react strangely, becoming unusually quiet or exhibiting unusual behaviors. The light shifts dramatically, casting long, unusual shadows, and the sky takes on a surreal, twilight-like quality. This creates a potent atmosphere of wonder and mystery, ideal for capturing in photographs.
Incorporating the Surrounding Environment
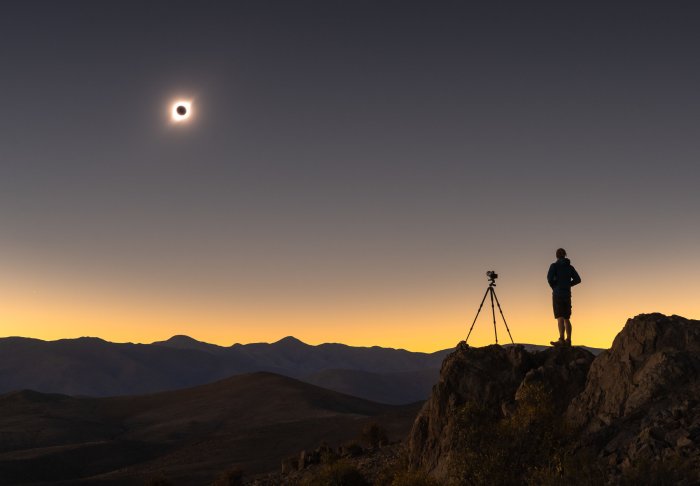
To effectively incorporate the environment, consider the context. A wide shot showcasing the landscape during the eclipse’s various stages (partial, totality, and post-totality) can effectively illustrate the changes in light and shadow. For instance, a photograph of a mountain range silhouetted against the eclipsed sun would dramatically highlight the event’s scale and impact on the environment. Including elements like trees, buildings, or people in the foreground can provide a sense of scale and perspective, grounding the celestial spectacle in the familiar world. Careful composition, utilizing leading lines and framing techniques, can further enhance the overall impact of the image.
Capturing Human Reactions
The emotional impact of a total solar eclipse is profound. Photographers should focus on capturing the awe, wonder, and shared experience among the onlookers. Candid shots of people reacting to the eclipse – their expressions of amazement, their hushed whispers, or their shared moments of contemplation – can powerfully convey the event’s emotional weight. Using a telephoto lens to isolate individual faces, or a wider lens to capture the collective reaction of a crowd, are both effective approaches. Consider using a shallow depth of field to isolate subjects and draw attention to their expressions.
Long Exposure Star Trails
Before or after totality, when the sky is sufficiently dark, long exposure photography can capture stunning star trails. This requires a tripod and a camera capable of long exposures. The duration of the exposure will determine the length and intensity of the star trails. For instance, a 30-minute exposure might produce a significant number of visible trails, whereas a shorter exposure will show less. The composition should consider the placement of the star trails relative to the landscape or other elements in the scene, creating a visually striking image. This technique can beautifully complement images of the eclipse itself, offering a broader perspective of the celestial event.
A Photo Series Illustrating Light and Shadow Changes
A compelling photo series can effectively document the dynamic changes in light and shadow during the eclipse. This series should include images from before the partial phase, through totality, and into the post-totality period. The first image might show the sun with a small, noticeable bite taken out of it. The subsequent images would show the increasing obscuration of the sun, leading to the dramatic totality phase where the corona becomes visible. After totality, the reverse process would be captured, ending with the sun almost fully visible again. Each image should highlight the unique characteristics of the light and shadow at that specific stage, creating a cohesive and visually impactful narrative. Careful attention to exposure settings is crucial to accurately capture the varying light levels throughout the eclipse.
Total Eclipse 2025
A total solar eclipse offers a unique and fleeting photographic opportunity. Capturing its progression requires careful planning and execution, encompassing various phases and demanding specific camera settings to achieve optimal results. This photographic timeline details the key moments and technical aspects for capturing this awe-inspiring celestial event.
Total Eclipse 2025: A Photographic Timeline
The total solar eclipse of 2025 presents a series of distinct photographic opportunities, each requiring a different approach to camera settings and composition. Understanding the timing and technical requirements for each phase is crucial for achieving a comprehensive and visually stunning record of the event. We’ll explore the photographic settings for each stage, from the initial partial eclipse to the moment of totality and the subsequent stages of the partial eclipse.
Optimal Camera Settings for Eclipse Phases
The following table Artikels suggested camera settings for various stages of the eclipse. Remember that these are guidelines, and adjustments may be necessary based on specific lighting conditions and your equipment. Always prioritize safety by using proper solar filters during all phases except totality.
| Eclipse Phase | ISO | Aperture | Shutter Speed |
|———————–|———|————-|——————–|
| Partial Eclipse (Early)| 100-200 | f/8 – f/11 | 1/250 – 1/500 sec |
| Partial Eclipse (Late) | 100-400 | f/8 – f/16 | 1/125 – 1/250 sec |
| Totality | 100-400 | f/5.6 – f/8 | 1/15 – 4 sec |
| Partial Eclipse (Late) | 100-200 | f/8 – f/11 | 1/250 – 1/500 sec |
Capturing the Progression of the Eclipse
A compelling visual narrative of the eclipse involves capturing a sequence of images that showcase the gradual change in the sun’s appearance. Begin shooting well before the partial eclipse begins to establish the context. As the moon progressively obscures the sun, the changing light will require adjustments to your exposure settings. During totality, remove your solar filter to capture the sun’s corona, the ethereal outer atmosphere visible only during a total eclipse. Remember to immediately replace the filter as totality ends. A series of images documenting this transition will tell a powerful story. Consider bracketing your exposures to ensure you capture a range of well-exposed images. For example, you might take three shots at different exposure settings for each phase, creating a safety net for optimal results.
Time-Lapse Photography of the Eclipse
Time-lapse photography is an excellent technique to create a dynamic visual representation of the eclipse’s progression. By capturing a sequence of images at regular intervals, you can condense hours of change into a short, captivating video. This requires a camera capable of intervalometer shooting or a remote control. Setting your camera to shoot a frame every 5-10 seconds throughout the entire event will provide ample footage for a compelling time-lapse. Remember to use a solar filter for all phases except totality, and be mindful of potential changes in lighting conditions requiring exposure adjustments during the shoot. Post-processing will allow you to adjust the speed and add music or other effects to enhance the final product. For instance, a time-lapse showing the moon’s shadow moving across the landscape during totality would create a stunning visual effect, similar to what was observed during the 2017 total solar eclipse across the United States.
Post-Processing Techniques for Eclipse Photography

Post-processing is crucial for transforming raw eclipse images into breathtaking final products. The unique challenges presented by the extreme dynamic range (the vast difference in brightness between the sun’s corona and the surrounding sky), low light conditions, and potential lens artifacts require specialized techniques. This section details effective strategies for enhancing your eclipse photographs.
Software and Techniques for Enhancing Eclipse Details
Several software options are ideal for processing eclipse images. Adobe Photoshop, with its powerful tools for layer masking, adjustment layers, and advanced sharpening, remains a popular choice among professional astrophotographers. Similarly, PixInsight, a dedicated astrophotography processing suite, offers sophisticated tools for noise reduction, dynamic range compression, and specialized techniques for processing high-dynamic-range imagery. These programs allow for detailed enhancement of the corona’s delicate structures, the subtle gradations of light and shadow, and the prominence of any solar features visible during the eclipse. For example, using the “Curves” adjustment in Photoshop allows for precise control over tonal values, bringing out faint details in the corona without overexposing brighter areas. Techniques such as wavelet sharpening in PixInsight can selectively sharpen fine details without introducing unwanted artifacts.
Adjusting Contrast, Brightness, and Color Balance
Balancing contrast, brightness, and color is essential to achieve a visually appealing and scientifically accurate representation of the eclipse. The extreme brightness differences require careful management. Using tools like levels and curves in Photoshop or similar tools in PixInsight, the photographer can compress the dynamic range to reveal details in both the bright corona and the darker sky. Color balance adjustments might be necessary to compensate for any color casts introduced by the camera sensor or atmospheric conditions. For instance, a slight adjustment to the blue channel might enhance the corona’s subtle bluish hues. The goal is to achieve a natural-looking image that accurately reflects the observed event, without resorting to unrealistic color enhancements.
Noise Reduction and Sharpening in Low-Light Conditions, Total Eclipse 2025 Pictures
Eclipse photography often involves shooting in low-light conditions, leading to increased noise in the image. Sophisticated noise reduction algorithms, available in both Photoshop and PixInsight, are essential for minimizing this noise without sacrificing detail. These algorithms analyze the image’s texture and selectively reduce noise while preserving the fine structures of the corona. Furthermore, sharpening techniques should be applied carefully to enhance the details without introducing halos or other artifacts. Tools like Unsharp Mask in Photoshop or similar techniques in PixInsight allow for precise control over the sharpening process, enabling the enhancement of the corona’s delicate structures while maintaining image quality.
Workflow for Processing Eclipse Photos
A typical workflow begins with importing the raw images into the chosen software. Initial processing involves correcting any lens distortions or vignetting, followed by adjustments to white balance and exposure. Next, techniques for dynamic range compression are employed, such as using HDR merging techniques or carefully adjusting curves and levels. Noise reduction and sharpening are applied carefully, often using multiple passes with different settings to fine-tune the result. Finally, minor adjustments to color balance and contrast are made to refine the final image. This methodical approach ensures that the final image is a faithful and visually stunning representation of the event. Each step needs to be considered carefully and tested, so that the final product achieves the balance between detail and aesthetics.
Frequently Asked Questions about Total Eclipse 2025 Pictures
Planning to capture the celestial spectacle of the 2025 total solar eclipse? This section addresses common questions and concerns to help you prepare for a successful and safe photographic experience. Remember, safety is paramount during an eclipse.
Best Equipment for Photographing a Total Solar Eclipse
Capturing a total solar eclipse requires specific equipment. A DSLR or mirrorless camera with manual controls is essential for precise exposure adjustments. A telephoto lens, ideally with a focal length of at least 400mm, is crucial for capturing detailed images of the sun’s corona. A sturdy tripod is absolutely necessary to maintain stability during long exposures. A solar filter, specifically designed for visual and photographic use, is vital to protect your camera’s sensor from damage during the partial phases of the eclipse. Optional accessories include a remote shutter release to minimize camera shake, extra batteries, and a lens hood to reduce glare and improve image contrast.
Safe Solar Eclipse Photography Practices
Never look directly at the sun without proper eye protection. This is crucial during all phases of a partial eclipse. Similarly, never point your camera at the sun without a securely attached solar filter during partial phases. Even a small fraction of unfiltered sunlight can cause permanent eye damage and irreparable harm to your camera’s sensor. Only remove the solar filter during the brief period of totality, when the sun’s corona is visible. Remember to replace the filter immediately after totality ends. Using a properly rated solar filter is not just a recommendation—it’s a necessity for the safety of your eyes and equipment.
Finding Information on the 2025 Eclipse Path
Several reputable sources provide accurate maps and predictions for the 2025 total solar eclipse path. NASA’s website is an excellent resource, offering detailed maps showing the path of totality and the times of the eclipse at various locations. Other reliable sources include timeanddate.com and eclipsewise.com, which offer interactive maps and detailed eclipse information. These resources allow you to plan your viewing location based on the duration of totality and other relevant factors. For example, NASA’s website might highlight specific regions within the path of totality where the eclipse will be visible for the longest duration.
Common Mistakes to Avoid During Eclipse Photography
A common mistake is neglecting proper camera settings. Incorrect exposure settings can result in overexposed or underexposed images. Another frequent error is failing to account for the dynamic range of the eclipse, resulting in a loss of detail in either the bright or dark areas of the image. Furthermore, forgetting to use a sturdy tripod can lead to blurry images, especially during long exposures. Finally, not practicing beforehand with your equipment and settings can lead to missed opportunities and disappointing results. Practicing with similar lighting conditions before the eclipse day is crucial for success.
Sharing Eclipse Photos
Sharing your stunning eclipse photographs is easy thanks to various online platforms. Websites like Flickr, 500px, and Astrobin offer dedicated communities for astrophotography enthusiasts where you can share your images and receive feedback. Social media platforms like Instagram, Facebook, and Twitter are also excellent options for sharing your work with a wider audience. When sharing online, always provide relevant information about your equipment, settings, and location. This context enhances the viewer’s appreciation of your work. Consider joining online photography forums or communities to connect with other eclipse photographers and share your experiences.